The best way to brew coffee without an espresso machine
If you’re a coffee lover, you’d know that starting your day with a good cup of joe makes all the difference. But let’s be real—if you’re dabaoing a $7 latte from a cafe every morning, your dreams of affording a BTO flat might just stay as dreams. With inflation on the rise, brewing your own coffee at home is not only more budget-friendly but also surprisingly satisfying. And no, you don’t need a fancy espresso machine to do it.
In this guide, we’ll walk you through five easy and affordable brewing methods that deliver café-worthy results without breaking the bank: Aeropress, French Press, V60 Pour-Over, Chemex, Moka Pot, and Cold Brew.
We’ll also cover the key factors to consider when choosing a method, whether you’re after convenience, flavour preference, budget, or skill level. Get ready to level up your home brewing game and impress yourself (and your wallet) with some seriously good coffee.
Table of Contents
Filtered vs. Infusion Coffee: what’s the difference?
Before we dive into the brewing methods, it’s important to understand the difference between filtered and infusion coffee. These are two distinct ways of making your cuppa, and they each have their unique flavour profiles and preparation techniques.
Here’s a quick breakdown of what sets them apart:
| Filtered Coffee | Infusion Coffee | |
| Brewing Method | Water passes through coffee grounds and a filter | Coffee grounds steep in water before being separated |
| Methods | Hario V60, Chemex, AeroPress, Moka Pot | French Press, Cold Brew |
| Equipment | Requires specific equipment like drip machines or pour-over setups, which may take more time and effort. | Generally simpler and requires minimal equipment. |
| Flavour Profile | Clean, crisp flavour with a lighter body | Rich, bold flavours with a fuller body |
| Texture | Minimal oils and fine particles | Retains more oils and fine particles |
| Best For | Those who enjoy bright, nuanced coffee notes | Those who prefer deep, bold flavours with more texture |
Reviewing different coffee brewing methods
Now that you know the two main ways to make coffee, let’s get to the fun part: the brewing methods.
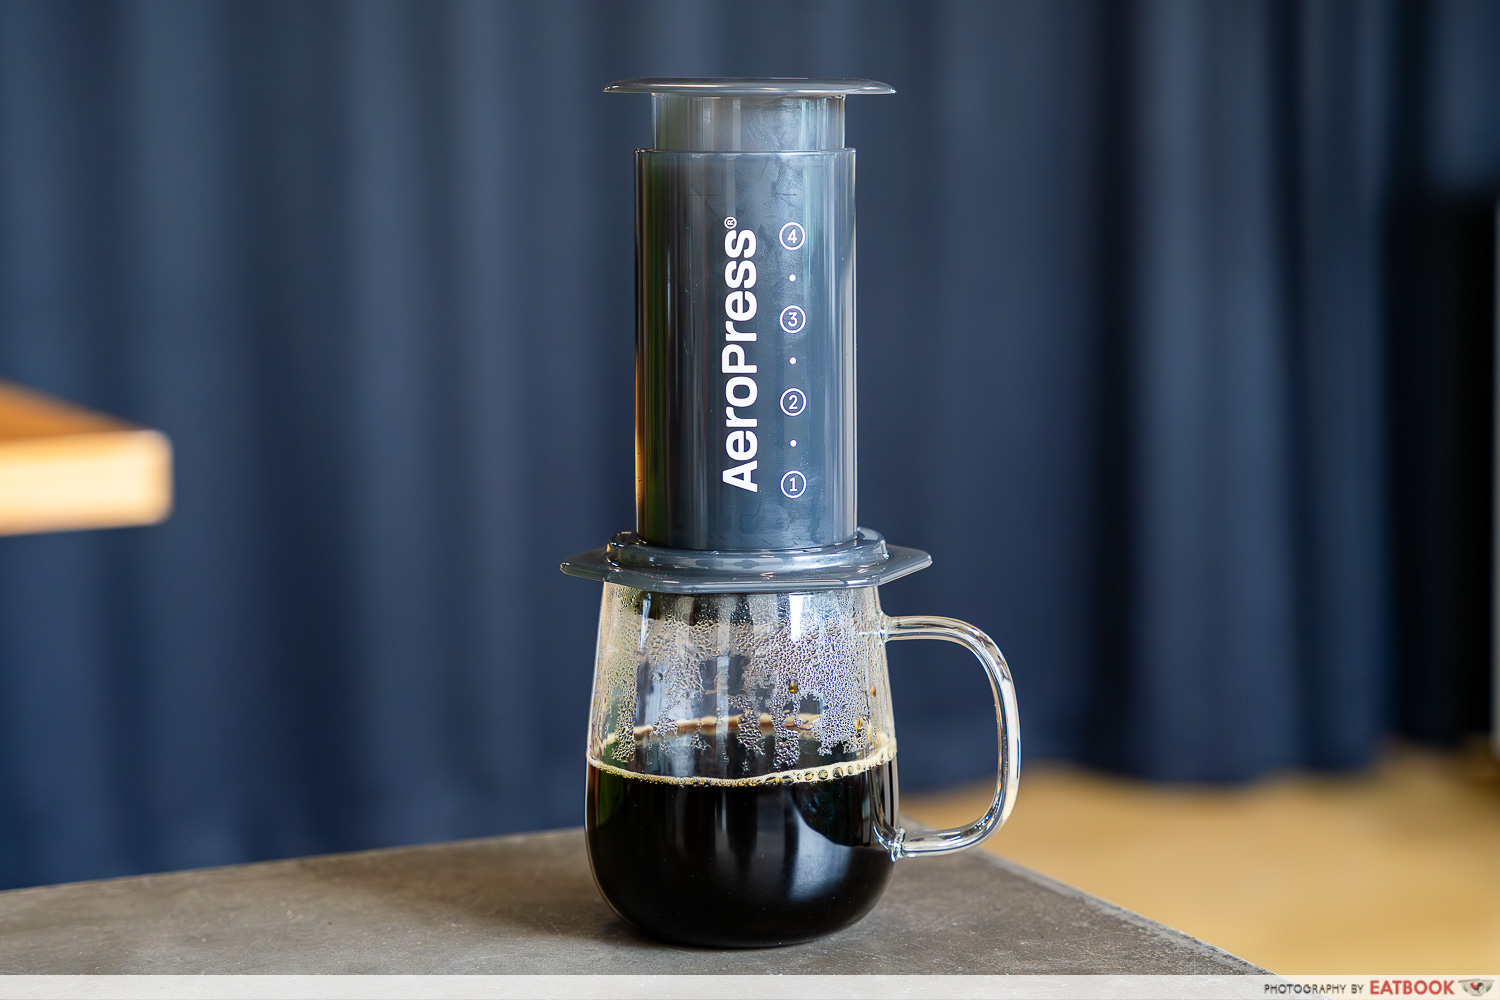
1. AeroPress (Filtered Coffee)
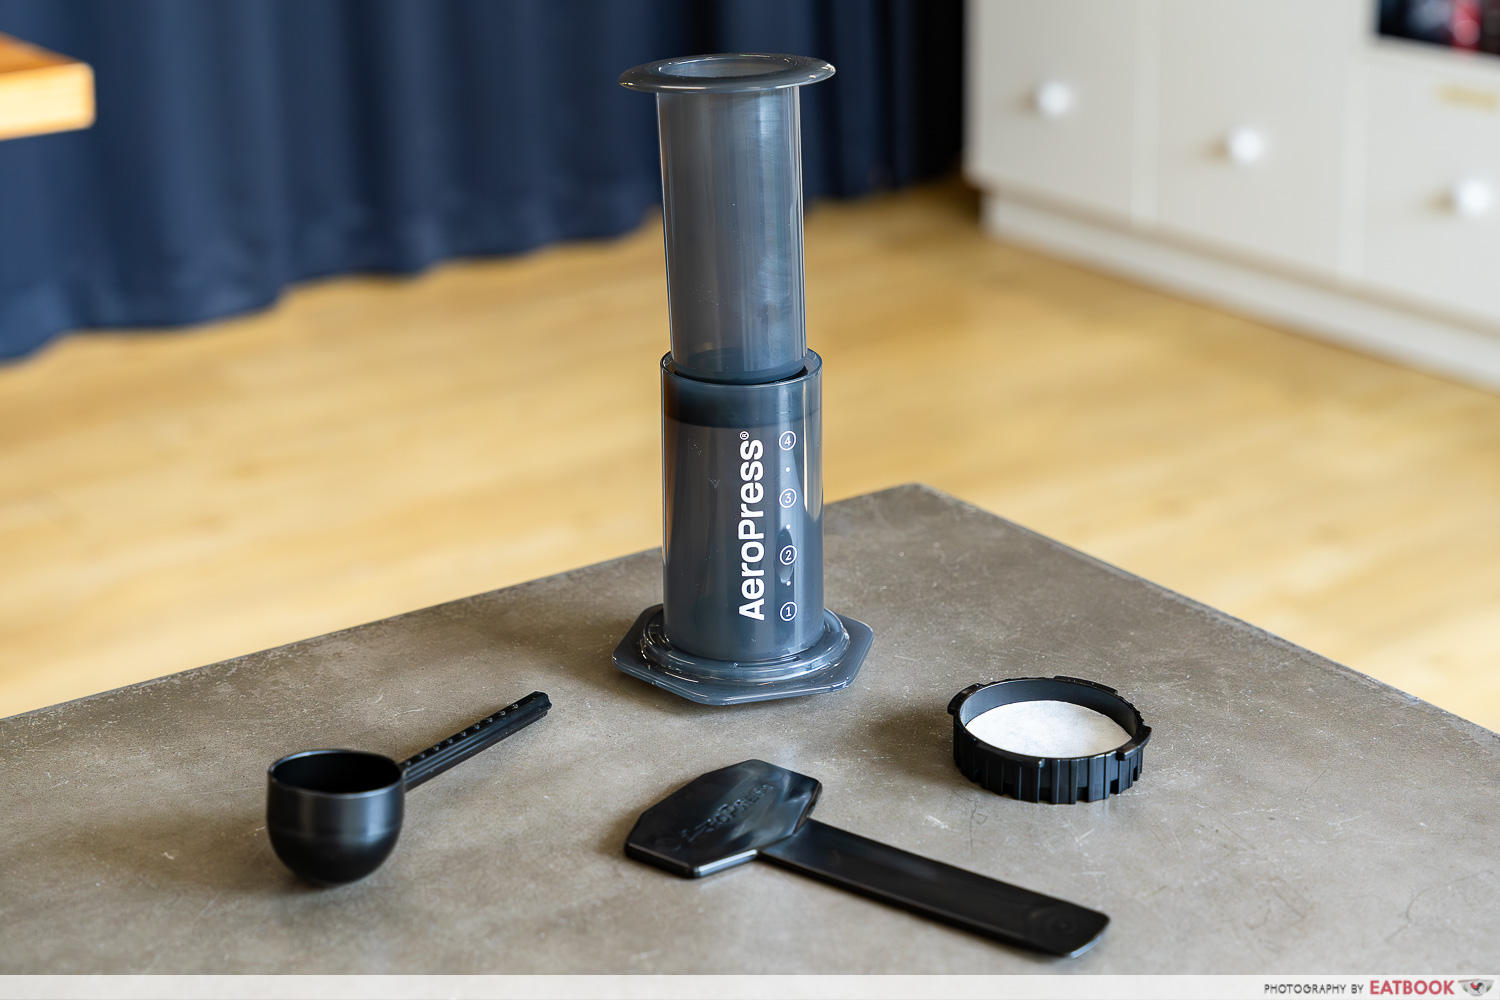
The AeroPress is like the Swiss Army knife of coffee makers. It’s compact, versatile, and ridiculously easy to use. This little gadget can get you a quick shot of espresso-style coffee, a smooth filter brew, or even a cold brew.
The device is made up of just three parts: a cylindrical chamber, a plunger with an airtight silicone seal, and a filter cap. It works by using air pressure to extract coffee. Because of that, you get lots of flavour control that can help to reduce bitterness and over-extraction, thanks to its short contact time with water.
How to use an AeroPress
Preparation:
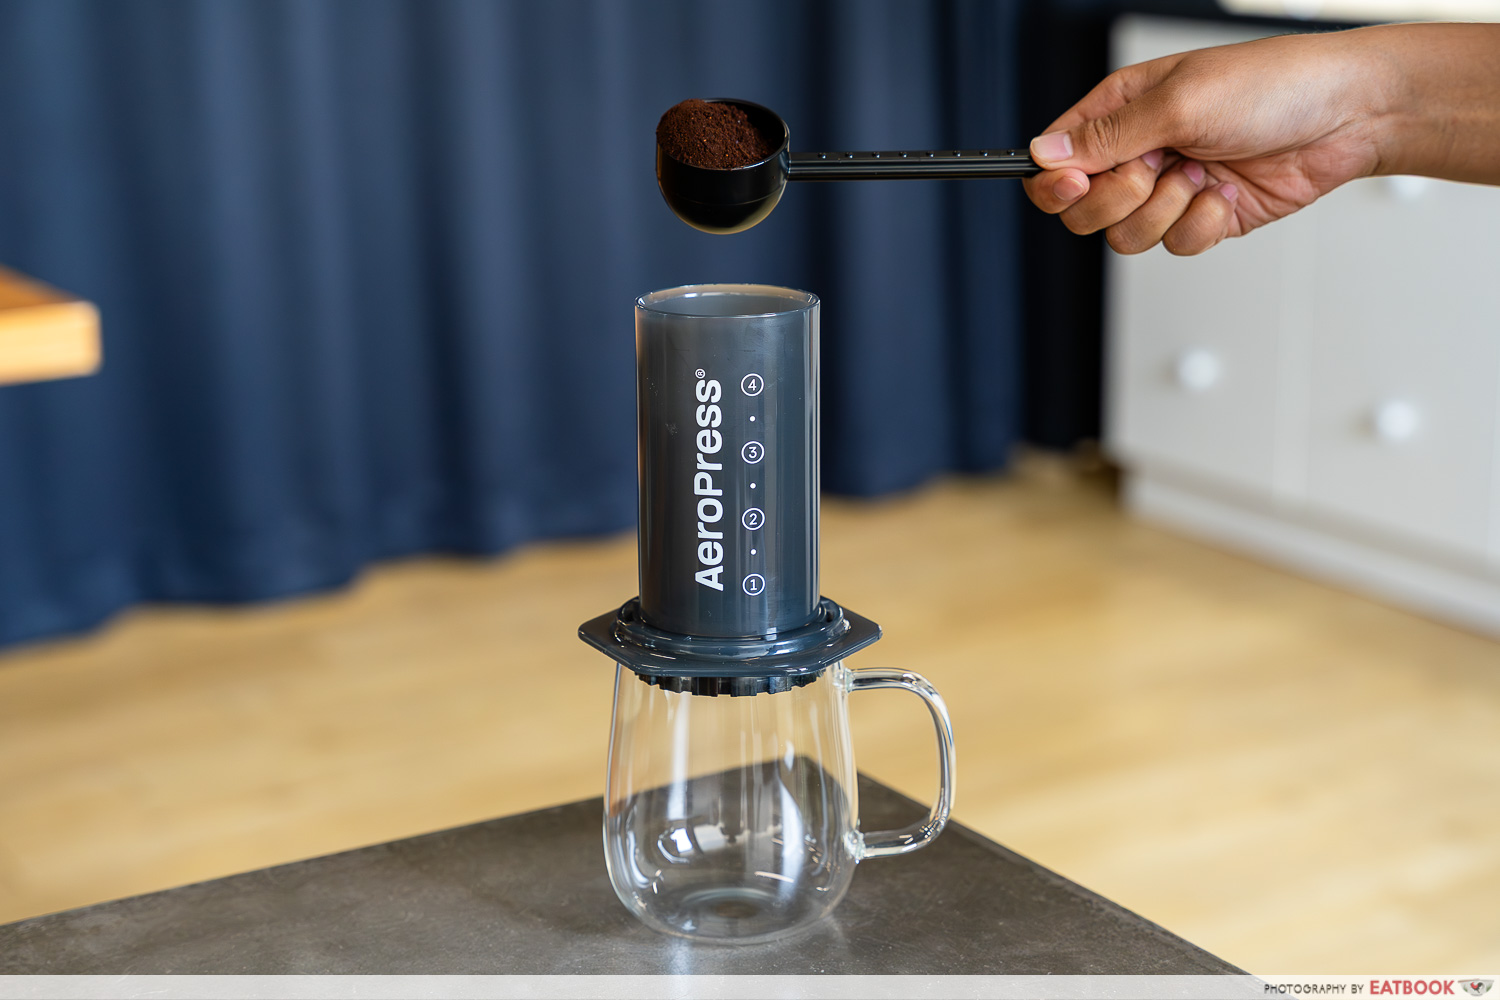
1. Insert a filter (paper or metal) into the cap and attach it to the chamber.
2. Add ground coffee (about 14g to 2g) into the chamber. The grind size should be finer than drip coffee but coarser than espresso.
Brewing:
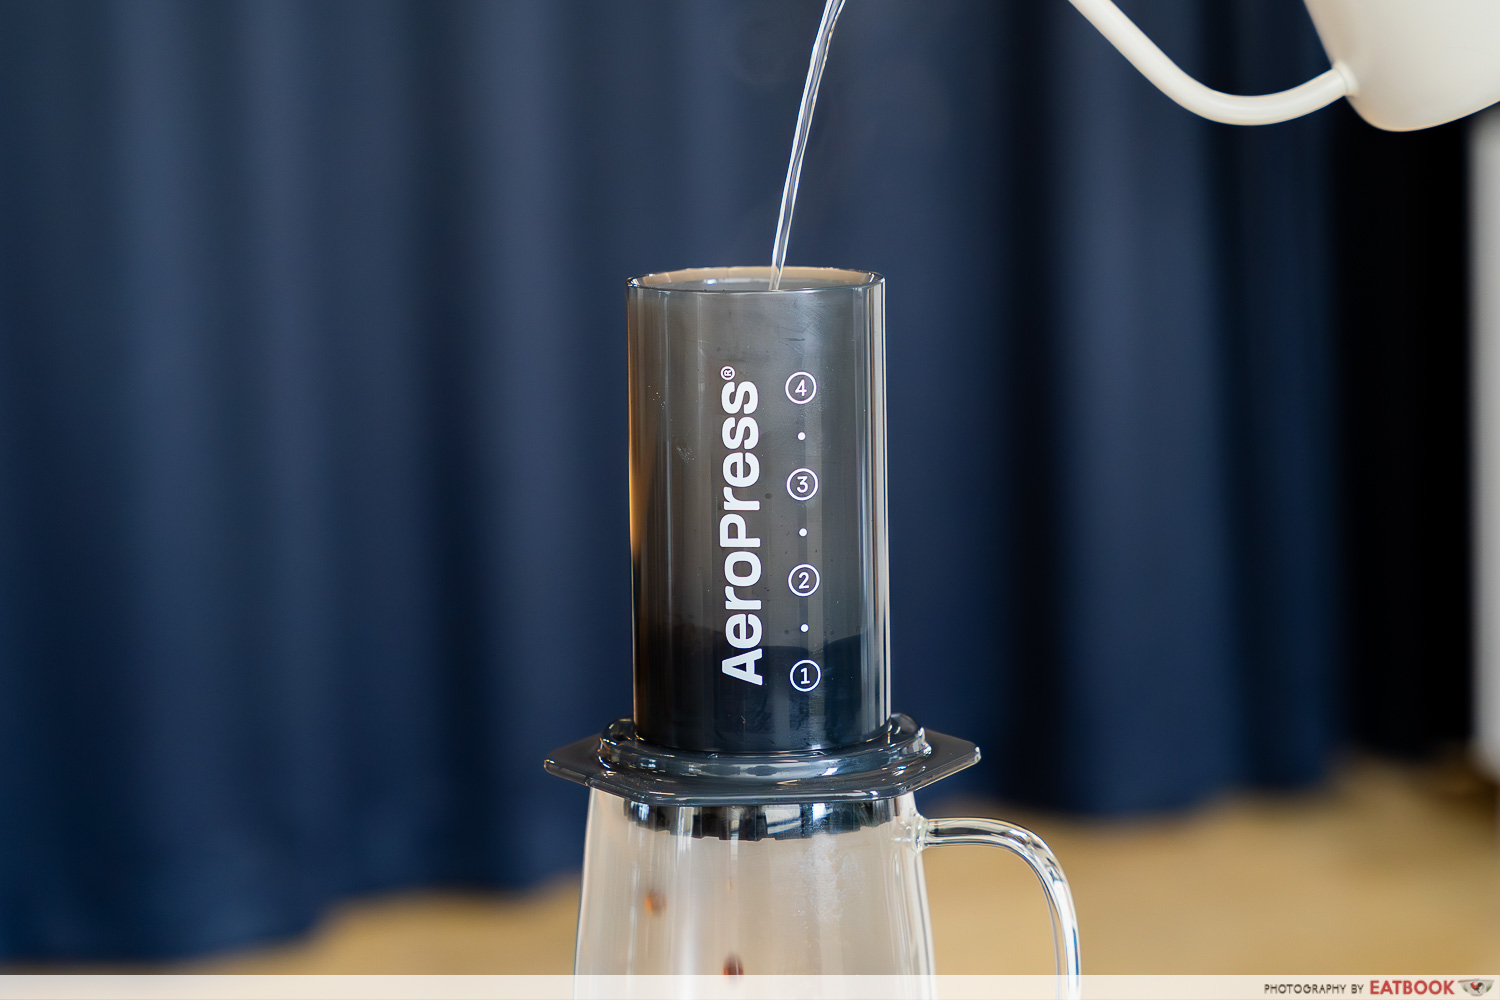
3. Pour hot water (27 to 37°C) over the coffee grounds in the chamber.
4. Stir for about 10 seconds to ensure the grounds are evenly saturated.
5. Let the coffee steep for 30 seconds to two minutes, depending on your recipe.
Extraction:
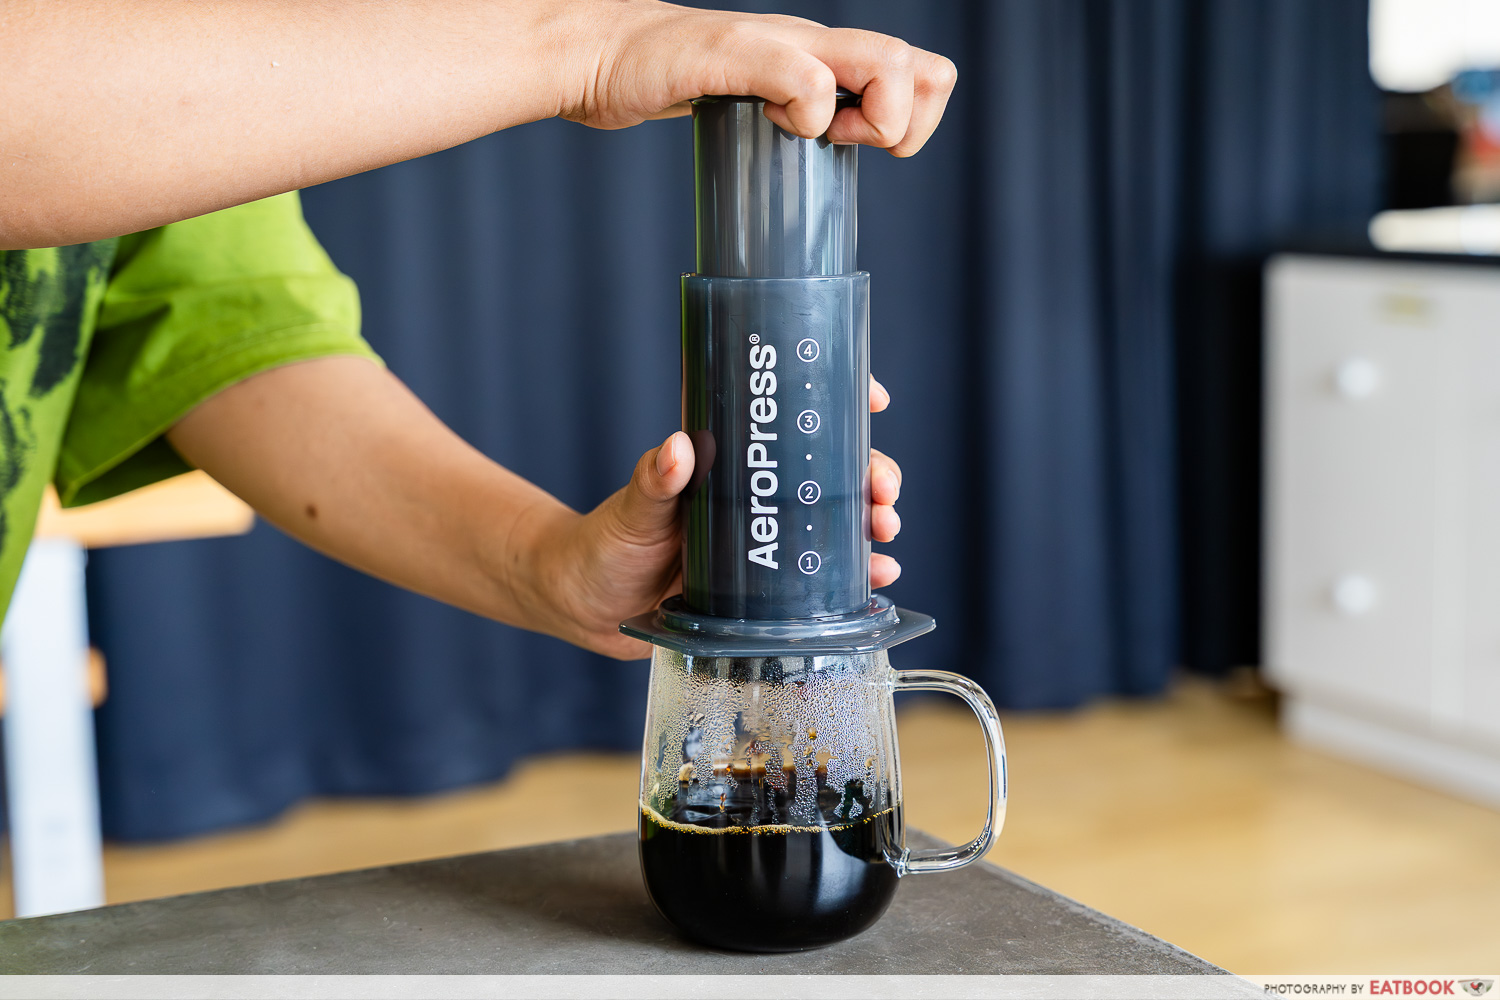
6. Insert the plunger into the chamber and press down gently.
7. The air pressure forces the water through the coffee grounds and filter, resulting in a concentrated, aromatic brew straight into your cup
For coffee drinkers who love experimenting with different brewing techniques and want something that’s portable and quick, the AeroPress is your boo. Its compact and lightweight design also makes it an ideal choice for travel and camping. Plus, it’s super easy to clean—a quick rinse is all it takes.
Just keep in mind that it’s best suited for single-cup brewing, so it may not be ideal if you’re making coffee for a group. And while paper filters are disposable, investing in a stainless steel reusable filter makes it a more sustainable option.
Best for: People who want a quick, strong, smooth cup with low acidity
Pros:
- Fast brew time, around 2 mins
- Compact & portable, great for travel
- Easy to clean, just pop the puck out and rinse
- Versatile, can make espresso-style shots, Americanos, etc.
Cons:
- Single cup at a time, not ideal for groups
- Plastic body may not appeal to those who prefer metal or glass gear
Order the AeroPress ($64.86) on Amazon.
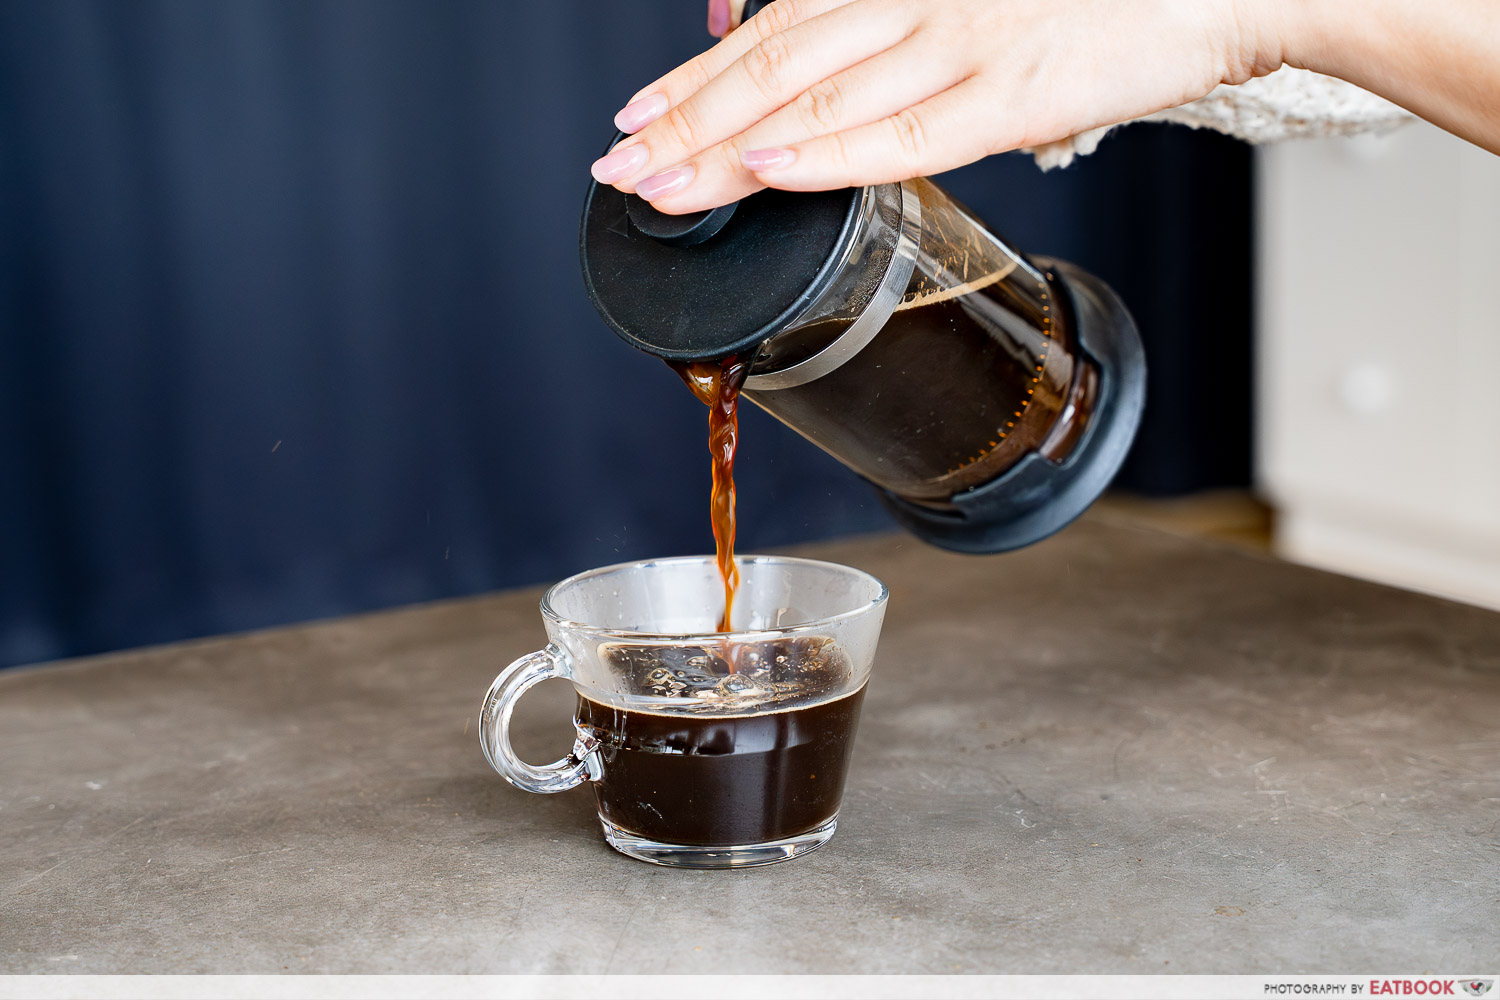
2. French Press (Infusion Coffee)
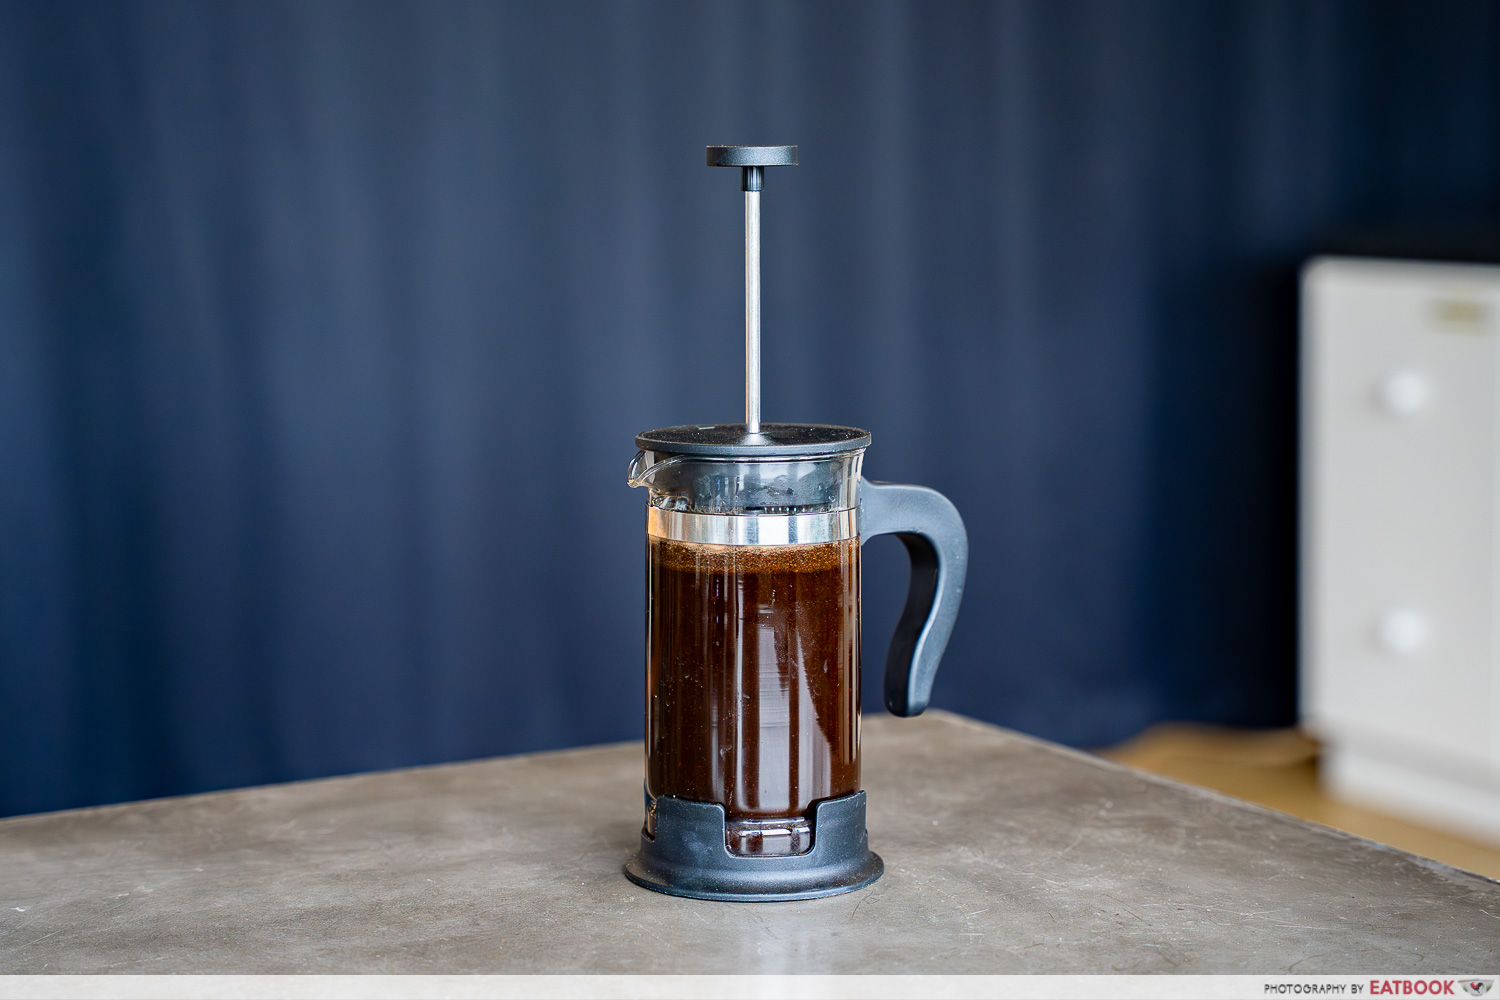
A French press is a classic that never goes out of style. It works through immersion brewing, where coarse coffee grounds are steeped in hot water before being separated by a plunger with a mesh filter. This method allows the natural oils and fine particles to pass through, giving you a bold, robust cup every time.
How to use a French Press
Preparation:
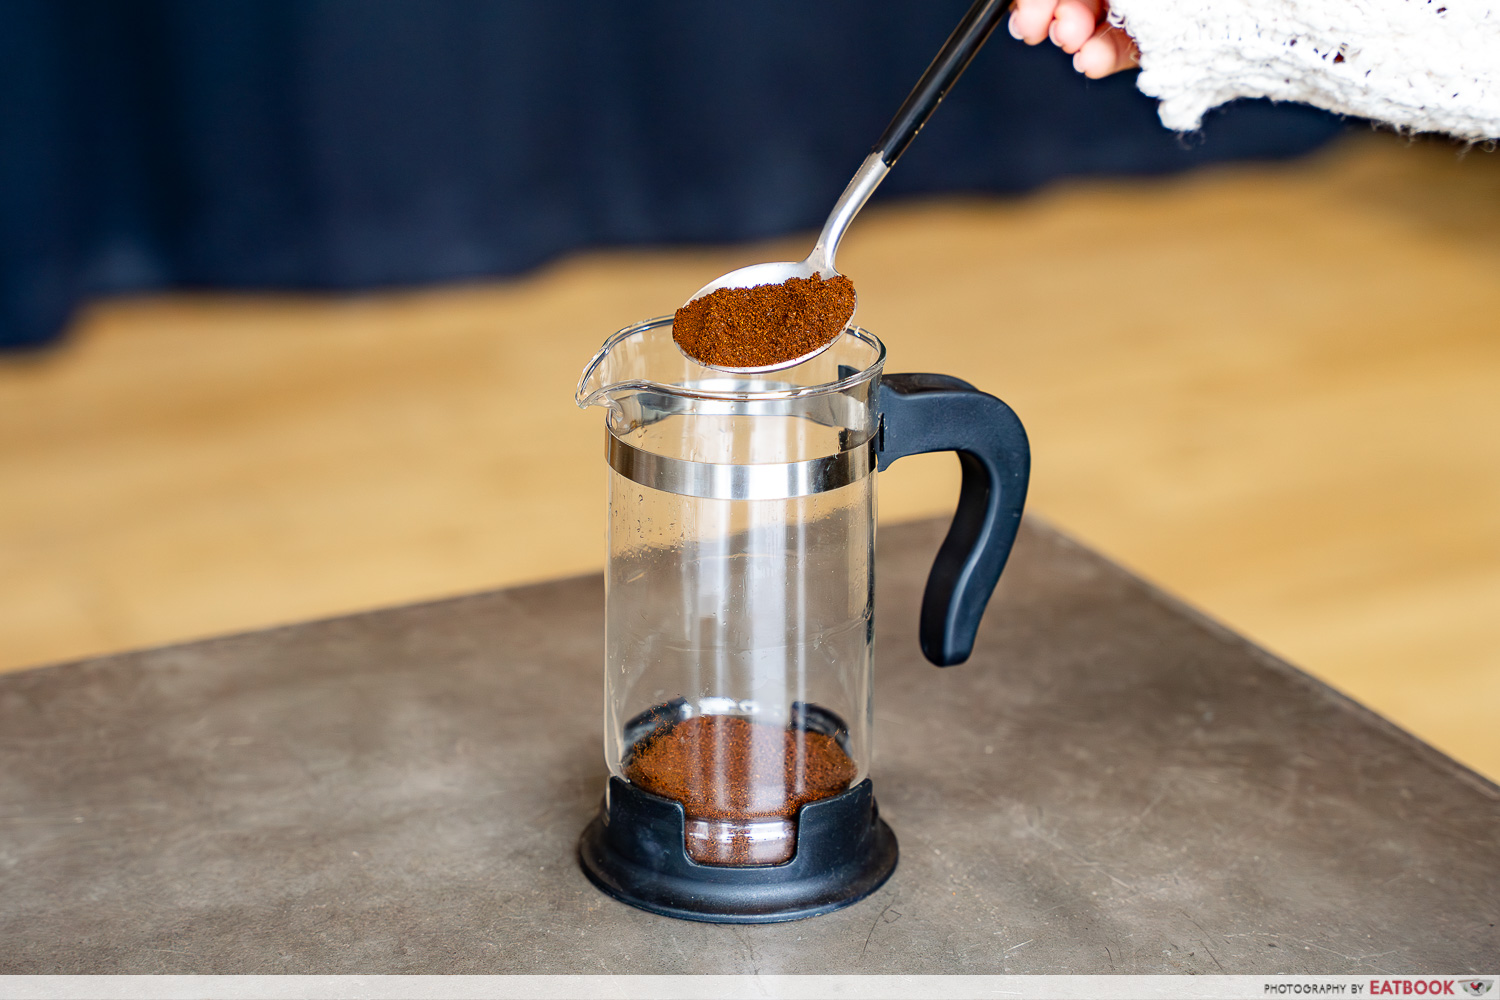
1. Rinse the French press with hot water to maintain brewing temperature.
2. Use coarsely ground coffee, like a breadcrumb texture, to avoid clogging the mesh filter.
3. Add 56g of coffee for 860ml of water (about 1:15 ratio) into the press.
Brewing:

4. Heat water to around 93–96°C.
5. Pour half of the water over the grounds and let it bloom for 30 seconds to release gases.
6. Gently stir with a wooden spoon to ensure even saturation.
7. Add the remaining water, place the lid on with the plunger pulled up, and let it steep for 4 minutes.
Extraction:
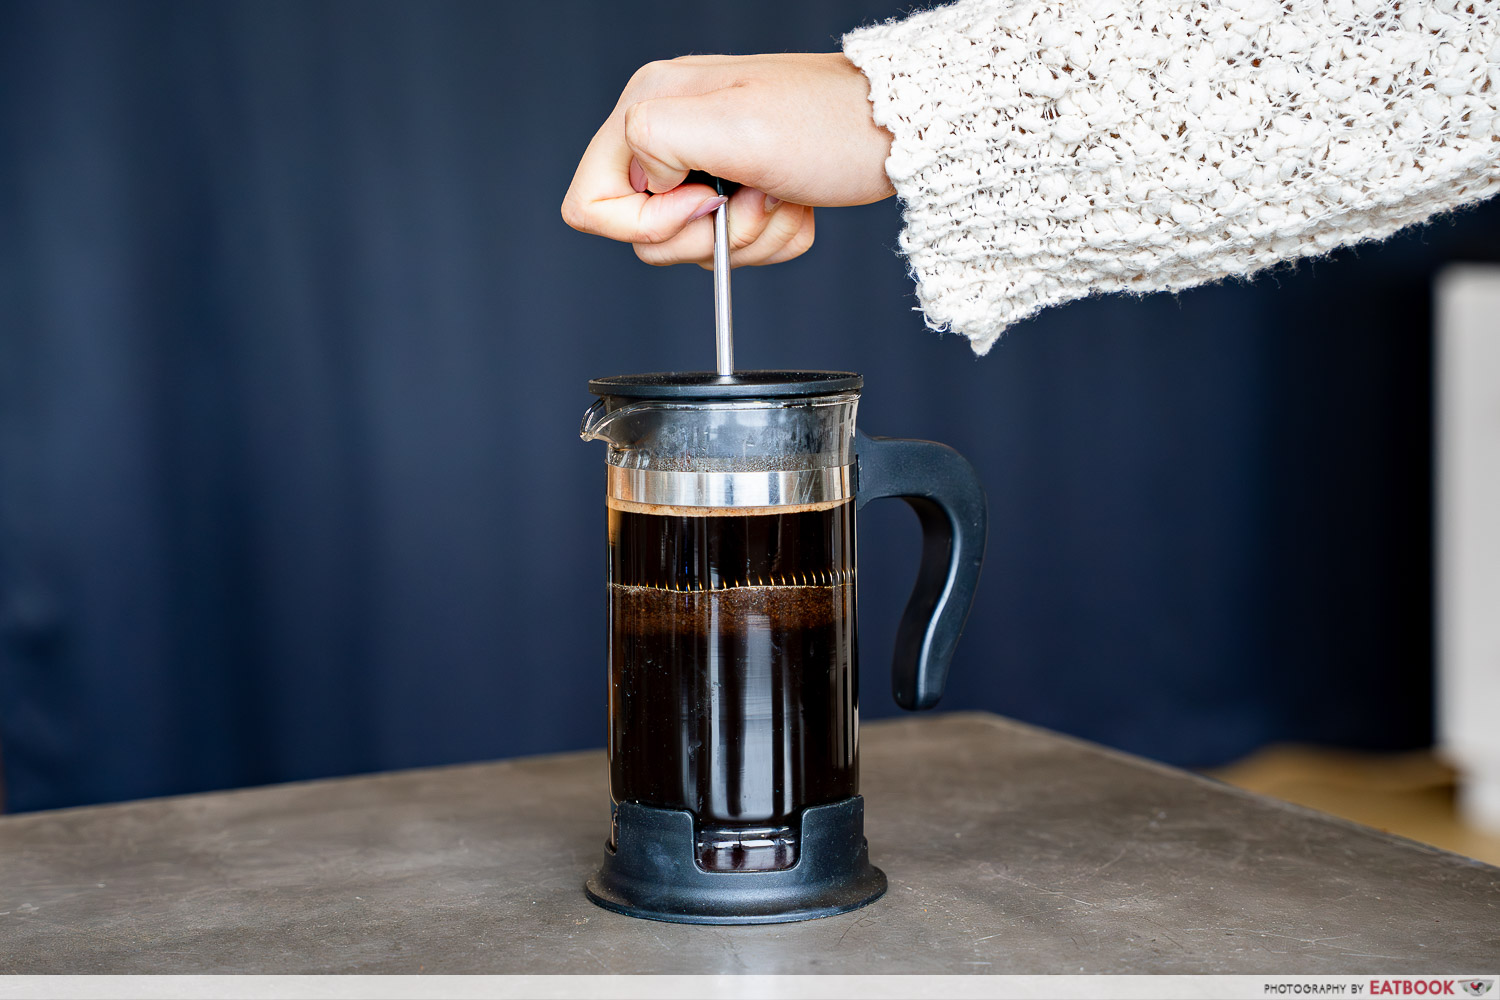
8. Slowly press the plunger down with steady pressure.
9. Pour out the coffee immediately to avoid over-extraction and bitterness.
The French press is affordable, easy to use, and doesn’t require any paper filters, making it a great option for anyone looking to brew coffee on a budget. You get a rich, full-bodied cup that retains all the natural oils and fine particles, giving it that signature bold flavour and slightly gritty texture. It’s also super versatile—you can even use it to make tea.
On the downside, it can be a bit gritty if not properly filtered, and the longer brew time of around four minutes might not be ideal if you’re rushing out the door.
Best for: Those who enjoy rich and full-bodied coffee.
Pros:
- Rich, full-bodied flavour
- Brews multiple cups at onc
- Beginner-friendly, simple to use
- No paper filters needed
- Can brew tea
- Widely available
Cons:
- Coffee might be gritty if not brewed properly
- Longer brew time (around 4 to 5 minutes)
- Can be fussy to clean
- Fragile glass body
Order a Bodum Brazil French Press ($22.86) on Amazon.
3. Hario V60 Coffee Dripper (Filtered Coffee)
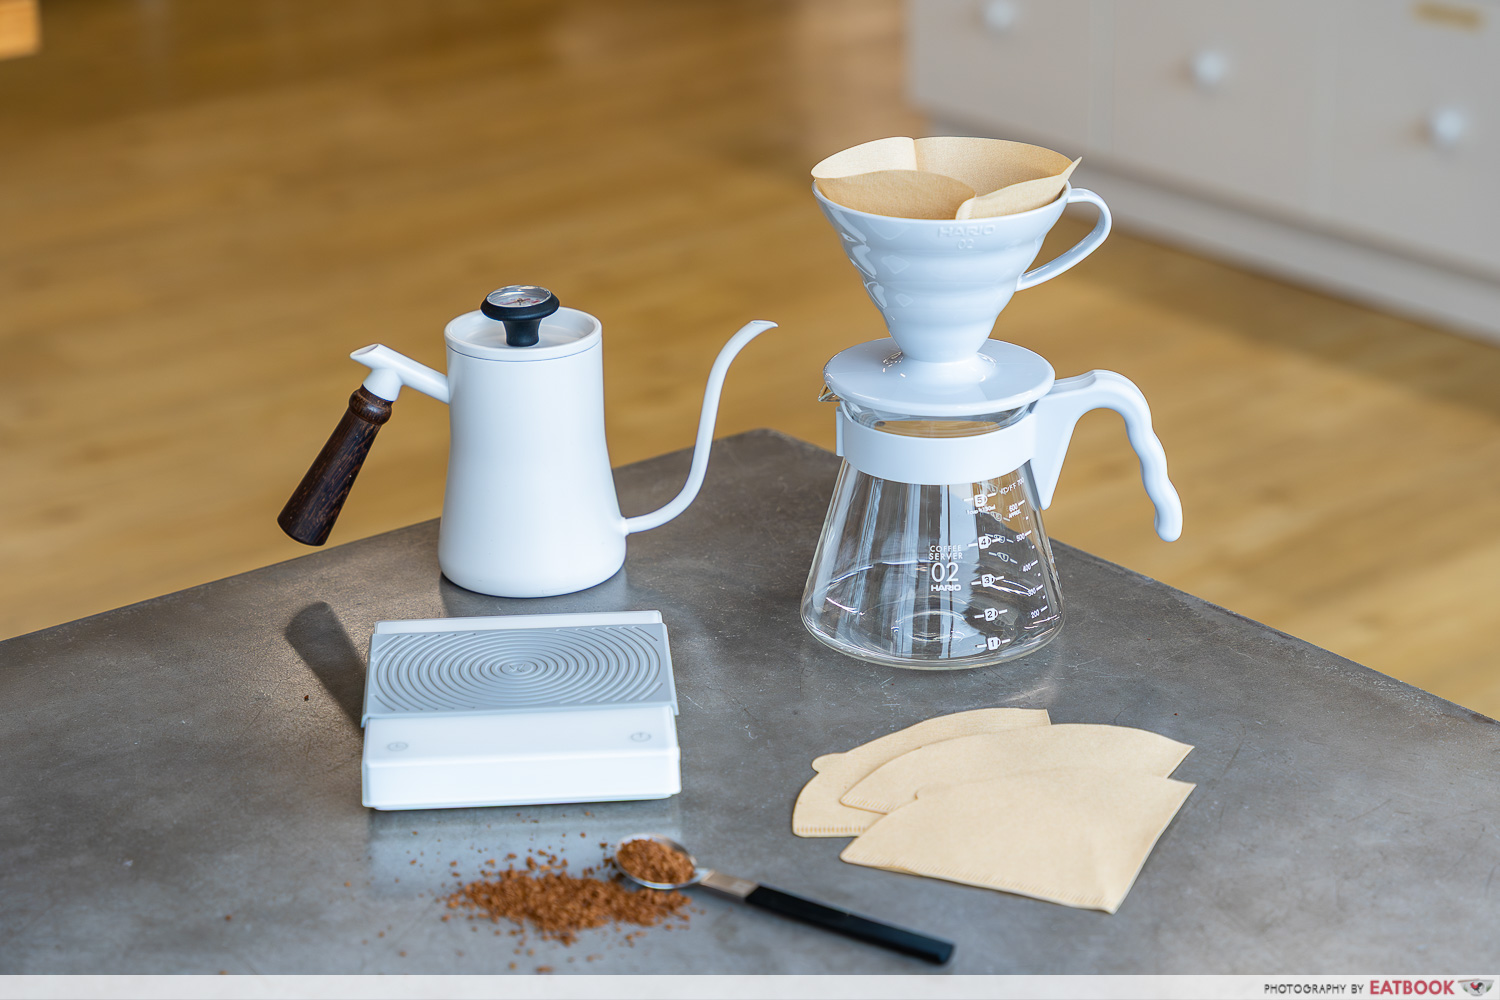
With a Hario V60 Coffee Dripper, you can channel your inner barista right at home. Made in Japan, this cone-shaped dripper features a large hole at the bottom and ridges on the interior to ensure even water flow.
The manual method gives you precise control over variables like grind size, water temperature, and pouring technique, resulting in a clean, nuanced cup bursting with flavour. It’s all about fine-tuning your brew to highlight the coffee’s natural characteristics, making it ideal for those who love to experiment and perfect their morning cuppa.
To get started, you’ll need five main components: the V60 Dripper, a Paper Filter, a Gooseneck Kettle, a Coffee Grinder, and a Scale. It might sound a bit gear-heavy, but the end result is worth it for those after a refined and aromatic cup.
How to use the Hario V60 Coffee Dripper
Preparation:

1. Place the paper filter into the V60 and rinse it with hot water to remove any paper taste and preheat the setup. Discard the water.
2. Use a medium-coarse grind (similar to sea salt) and measure out 20g of coffee. The ideal ratio is 1:15, so you’ll need 300g of water.
Brewing:
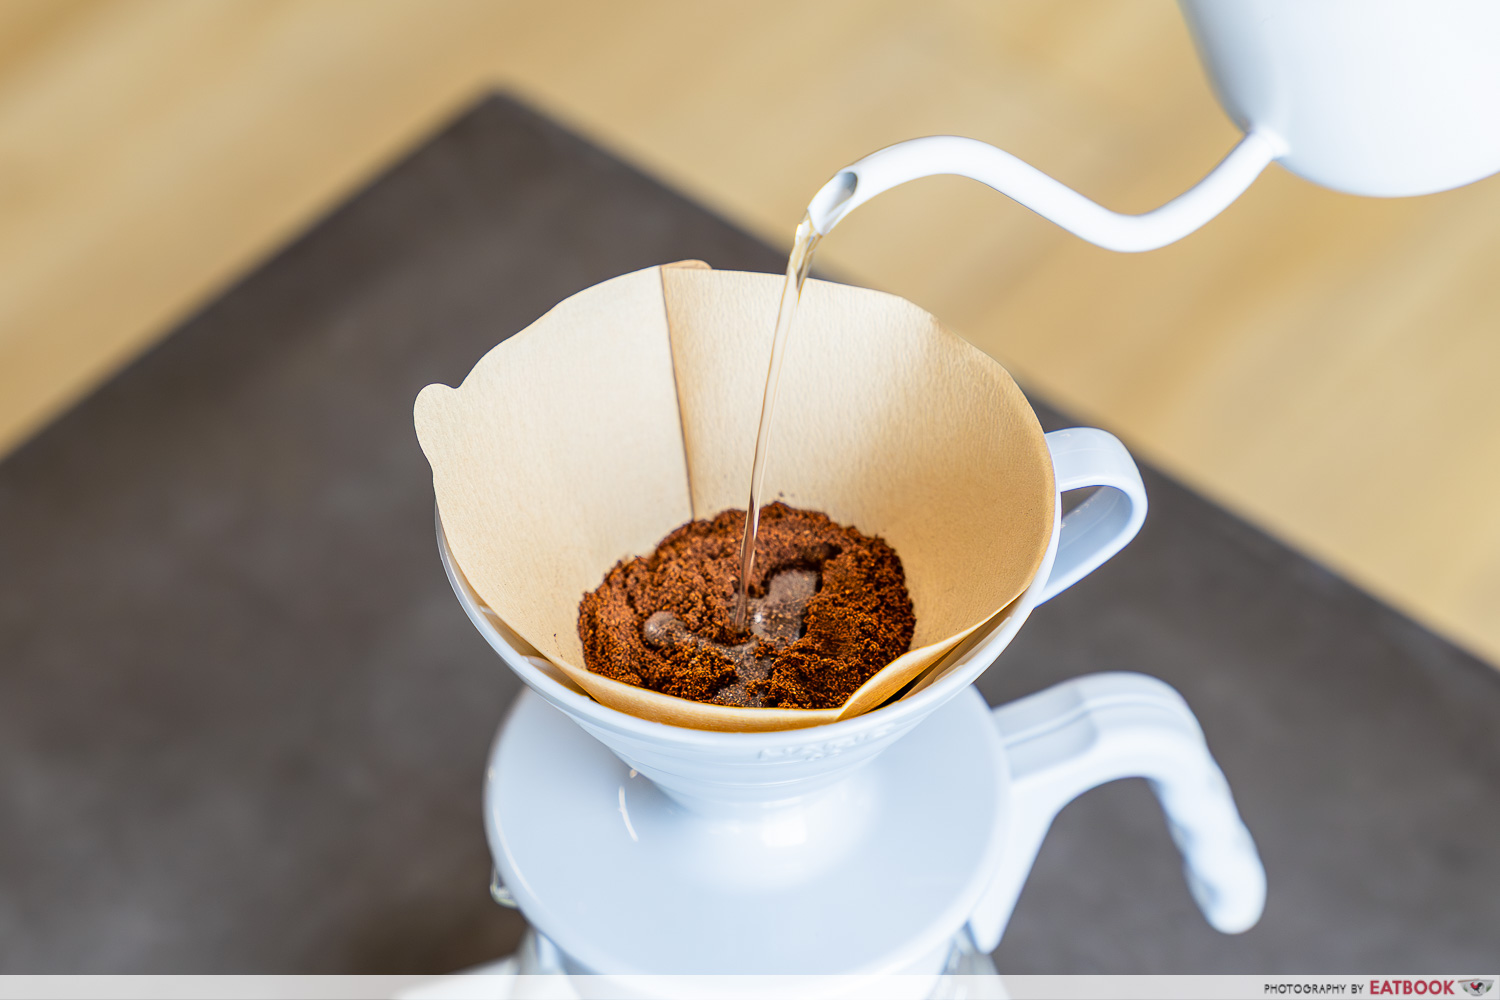
3. Add the ground coffee to the filter.
4. Pour about 40g of hot water (around twice the weight of the coffee) to bloom the coffee for 30 seconds. This step releases gases and enhances the flavour.
5. Continue pouring the remaining water in a slow, circular motion, starting from the centre and moving outward. Avoid pouring directly onto the filter.
6. Total brewing time, including the bloom, should take two to three minutes. Adjust grind size and pouring rate to fine-tune the extraction.
Extraction:
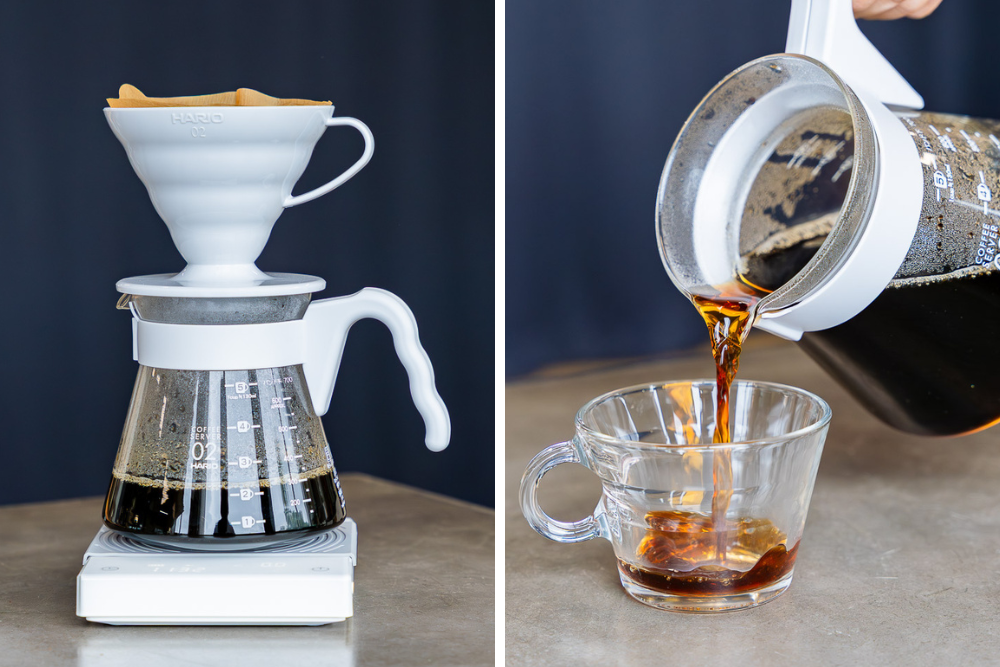
7. Once the coffee has finished dripping, remove the V60 and serve immediately to enjoy the freshest cup.
The V60 coffee maker method truly shines when it comes to flavour control. You get to customise every aspect of the brewing process, from the grind size to the pouring technique, allowing you to highlight the unique characteristics of different coffee beans. The end result is a clean, nuanced cup free from sediment and excess oils.
However, mastering the V60 coffee dripper takes some practice. You’ll also need a gooseneck kettle and a weighing scale for precise measurements, which might feel a bit intimidating if you’re new to brewing. It’s also a time-consuming process and only makes one cup at a time. But if you’re in the mood to take your coffee ritual to the next level, we promise you that this method is worth the effort.
Pros:
- Clean, nuanced flavour
- Barista-approved brewing method
- More control over your cuppa; you can adjust grind, pour, and bloom for precision
- Lightweight
Cons:
- Coffee might be gritty if not brewed properly
- Requires techique; not as beginner-friendly
- Gear-heavy
- Makes one cup at a time
Best for: Coffee drinkers who enjoy clean, bright flavours and have time to brew
Purchase a Hario V60 ($22.57) on Amazon.
4. Chemex (Filtered Coffee)
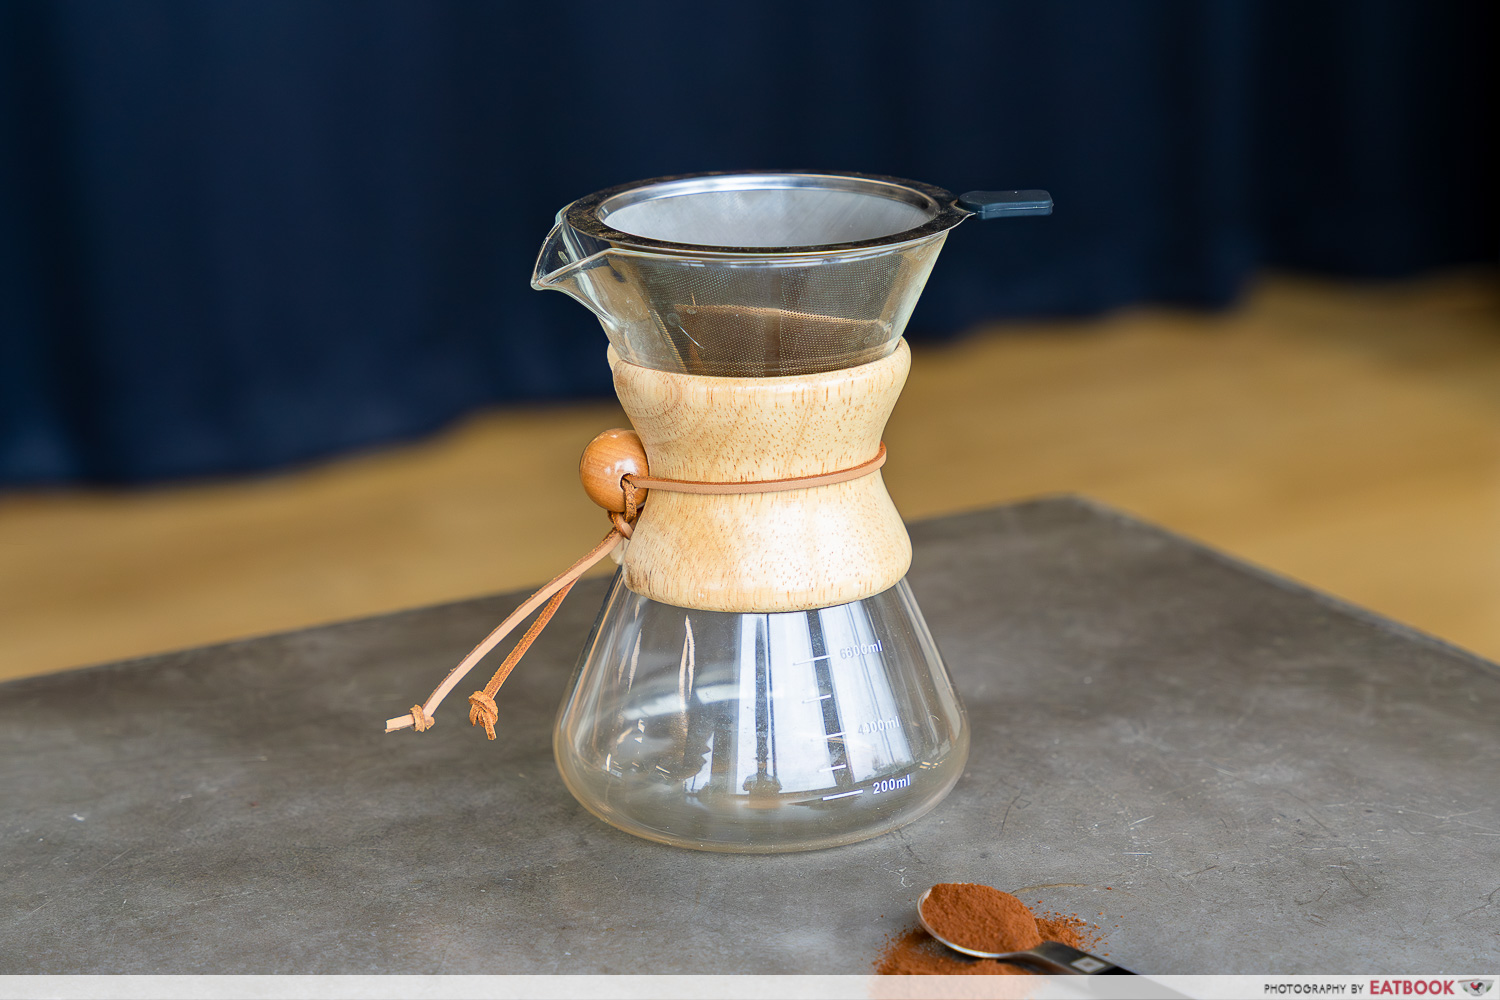
The Chemex is a beautifully designed manual pour-over coffee maker that combines both form and function. Crafted from a single piece of glass and often accented with a wooden collar, it’s as much a statement piece as it is a brewing tool. This manual pour-over method gives you precise control over brewing variables, allowing you to bring out the intricate flavours of your coffee.
Like the Hario V60, a Chemex is also a cone-shaped gadget using the pour-over method. However, they differ in technique and flavour. The Chemex uses a thicker filter, producing a smoother, cleaner cup with a tea-like body. It also requires a coarser grind and takes three to four minutes to brew. The V60 Coffee Dripper, on the other hand, is known for its bright and nuanced flavours with more control over the brewing process.
How to use the Chemex
Preparation:
1. Rinse the Chemex with hot water to warm it up and remove any residual flavours. Discard the water.
2. Fold the Chemex filter and place it in the top, making sure the three-layered side is aligned with the pouring spout.
3. Pour hot water over the filter to remove any papery taste and help it adhere to the glass. Discard the rinse water.
Brewing:
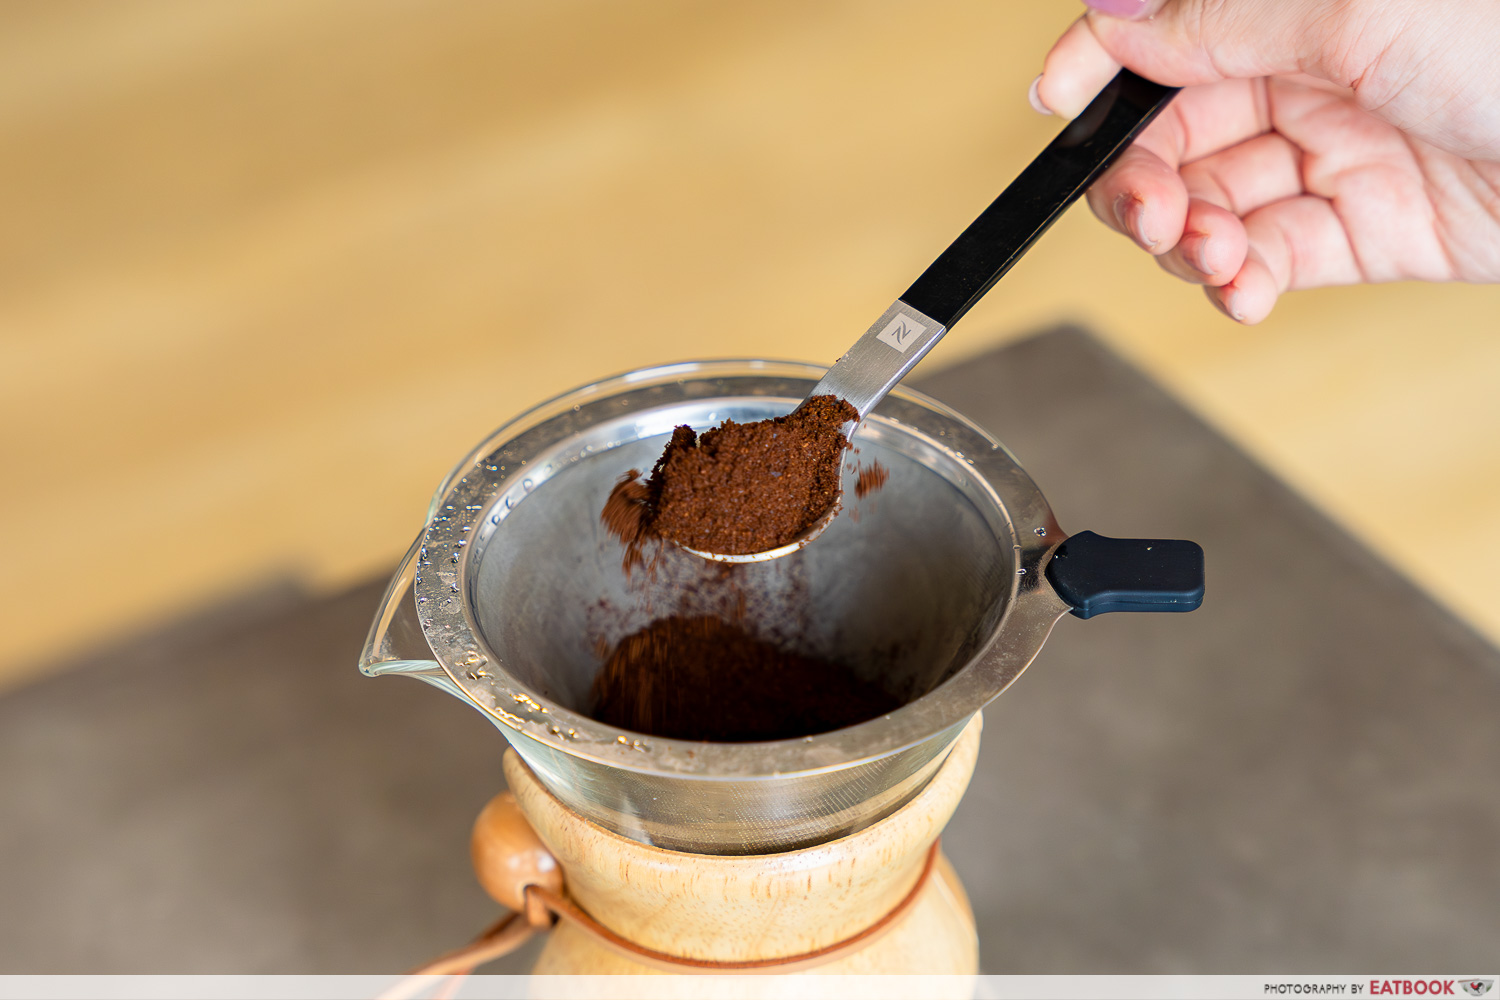
4. Use a medium-coarse grind, similar to kosher salt. Add about 30g to 42g of coffee for a standard brew.
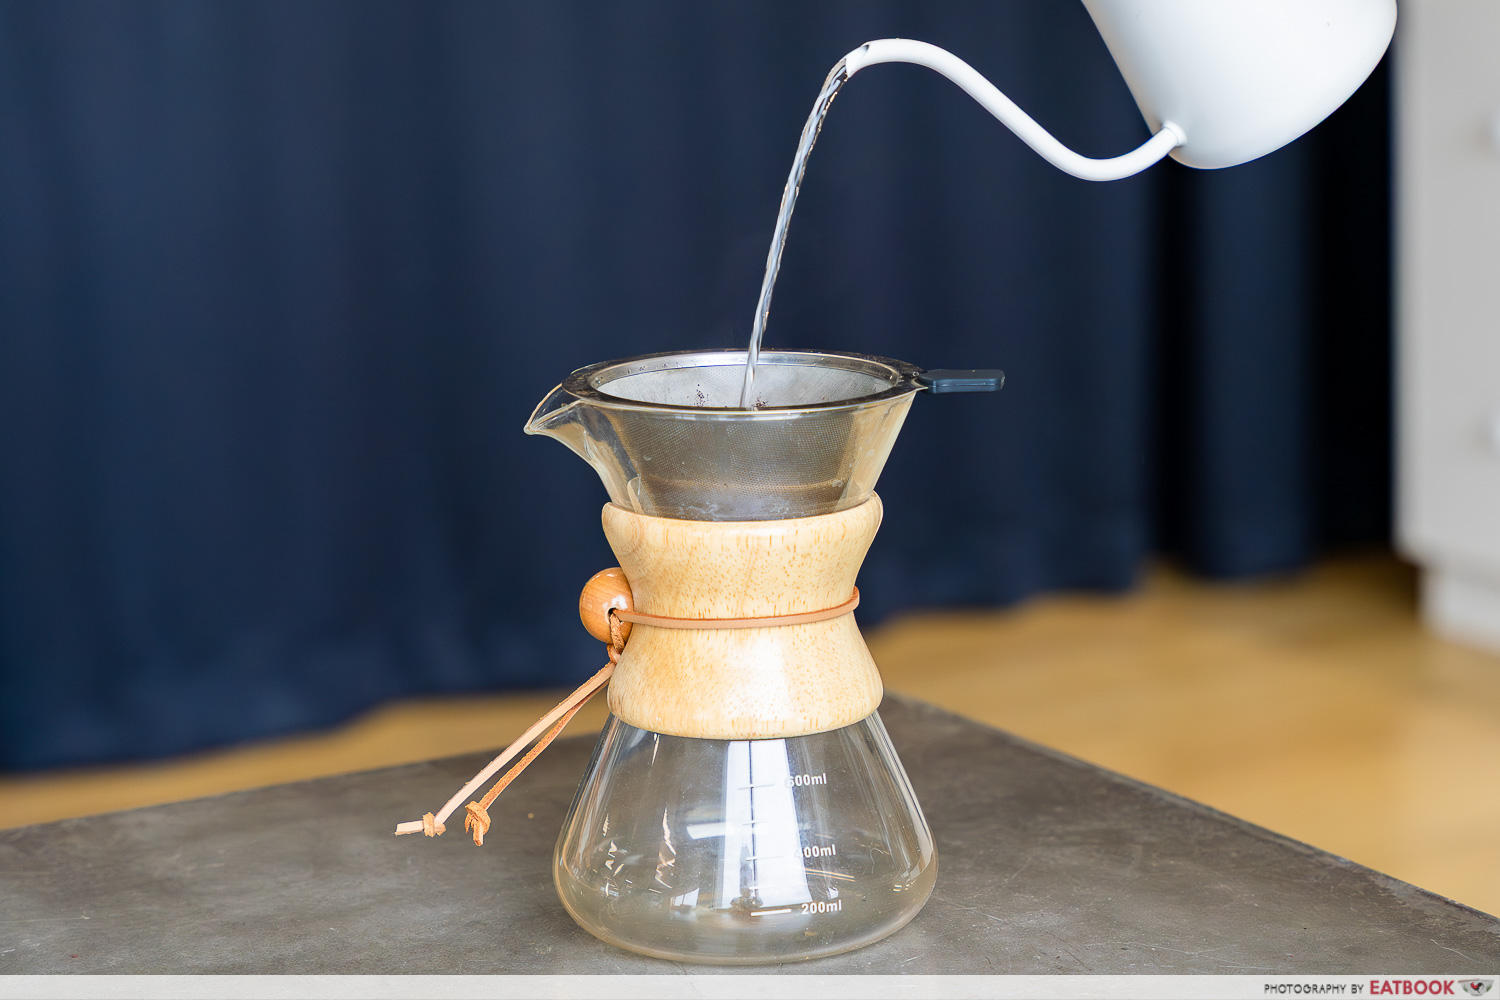
5. Pour enough hot water (about 80g to 100g) to saturate the grounds evenly. Let it sit for 45 seconds to release trapped CO2 and enhance the aroma.
6. Continue pouring the remaining water in a circular motion, avoiding the edges of the filter. Aim for a total of 600g to 700g of water.
7. Allow the water to pass through the filter. The entire brewing process should take about four minutes.
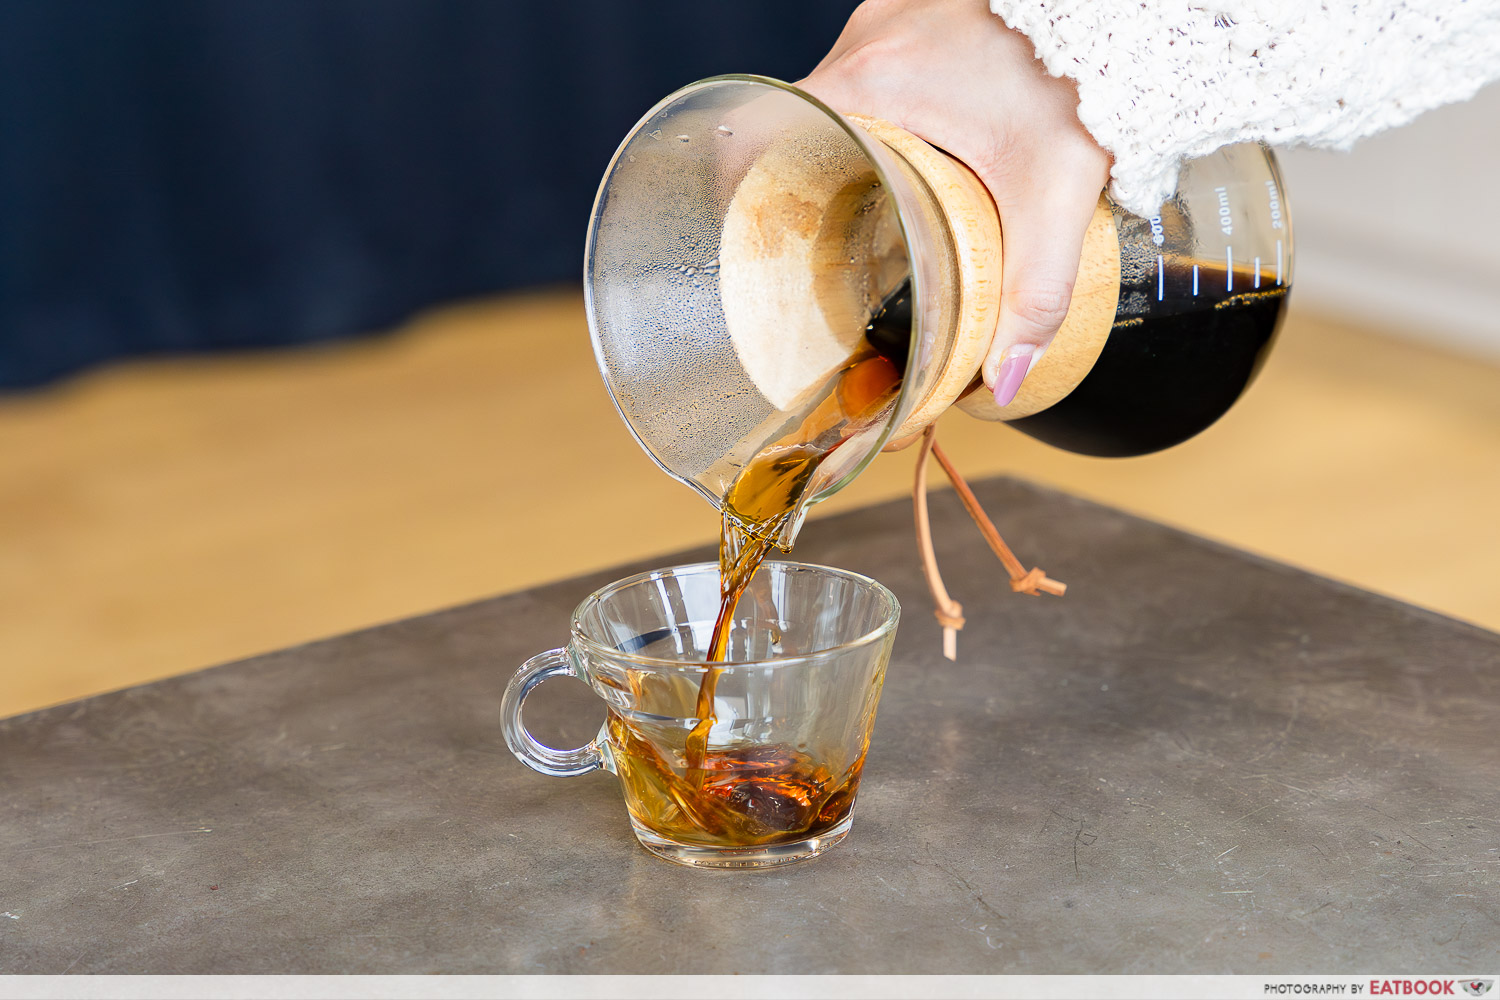
Extraction:
8. Carefully lift out the filter and discard the grounds.
9. Pour the coffee into your cup and enjoy its clean, smooth flavour.
When it comes to flavour clarity and precision, the Chemex is where its at. There are also models in various sizes, such as a 3-cup, 6-cup, 8-cup, and 10-cup, ideal for those whose love language is making coffee for friends. Plus, it’s a sustainable vessel with no plastic components, so it’s great for eco-conscious coffee drinkers.
However, it does require special paper filters and a gooseneck kettle for optimal pouring control. And if you’re someone who’s super clumsy, you might want to think twice. While aesthetically pleasing, the glass carafe can be delicate—not the best choice for those with poor coordination. Still, if you’re willing to put in the effort, the V60 rewards you with an exceptionally clean and nuanced cup every time.
And just a quick tip: the Chemex is technically a house-brand pour-over brewer, and its classic glass design comes with a heftier price tag. However, there are more affordable alternatives from brands like Bodum on the market.
Pros:
- Clean, tea-like coffee that removes bitterness
- Beautiful design, doubles up as a countertop piece
- Brews multiple cups
Cons:
- Fragile
- Longer brew time (around 4 to 5 minutes)
- Requires special filters
- Less body in your coffee
Best for: Coffee drinkers who love experimenting with their brew and enjoy clean, bright flavours.
Order a Chemex glass coffeemaker ($60.48) on Amazon.
5. Moka Pot (Filtered Coffee with Pressure)
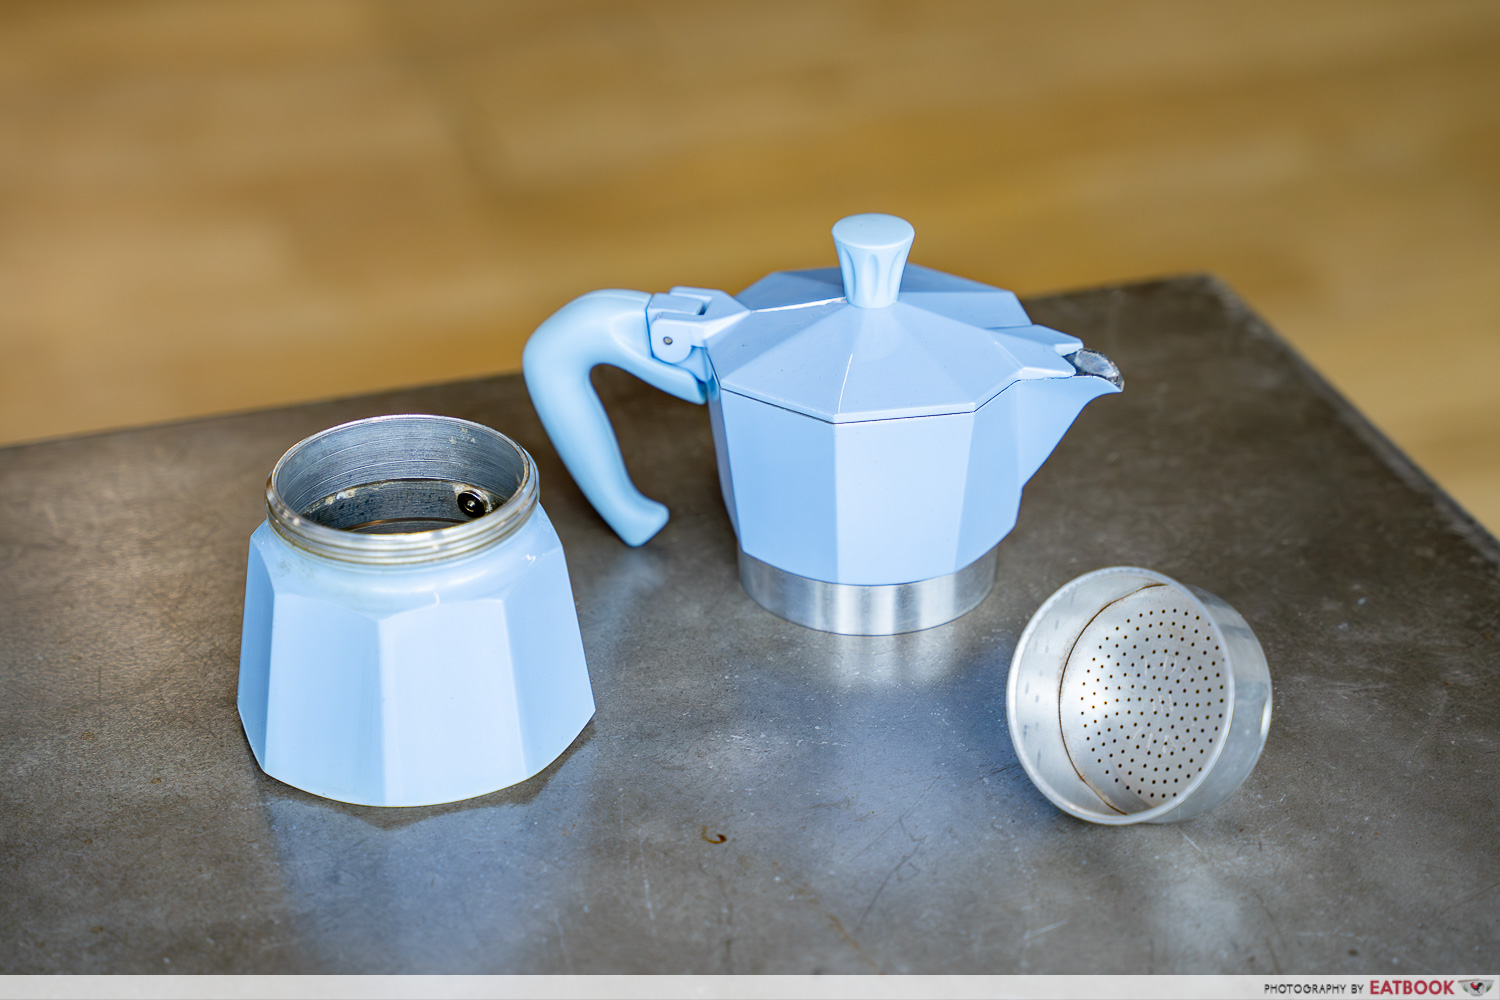
For a daily cup of rich, full-bodied coffee without splurging on a fancy espresso machine, the Moka pot is your answer. This stovetop brewing device uses steam pressure to force hot water through coffee grounds, producing a strong, espresso-like brew that packs a punch. It’s the closest you’ll get to the authentic Italian coffee experience at home. Delizioso!
The Moka pot consists of four main components: the bottom chamber (where water goes), the middle chamber (filter basket for coffee grounds), the top chamber (where the brewed coffee collects), and the steam tube that connects it all. It’s simple but effective, and no barista skills are needed.
How to use a Moka pot
Preparation:
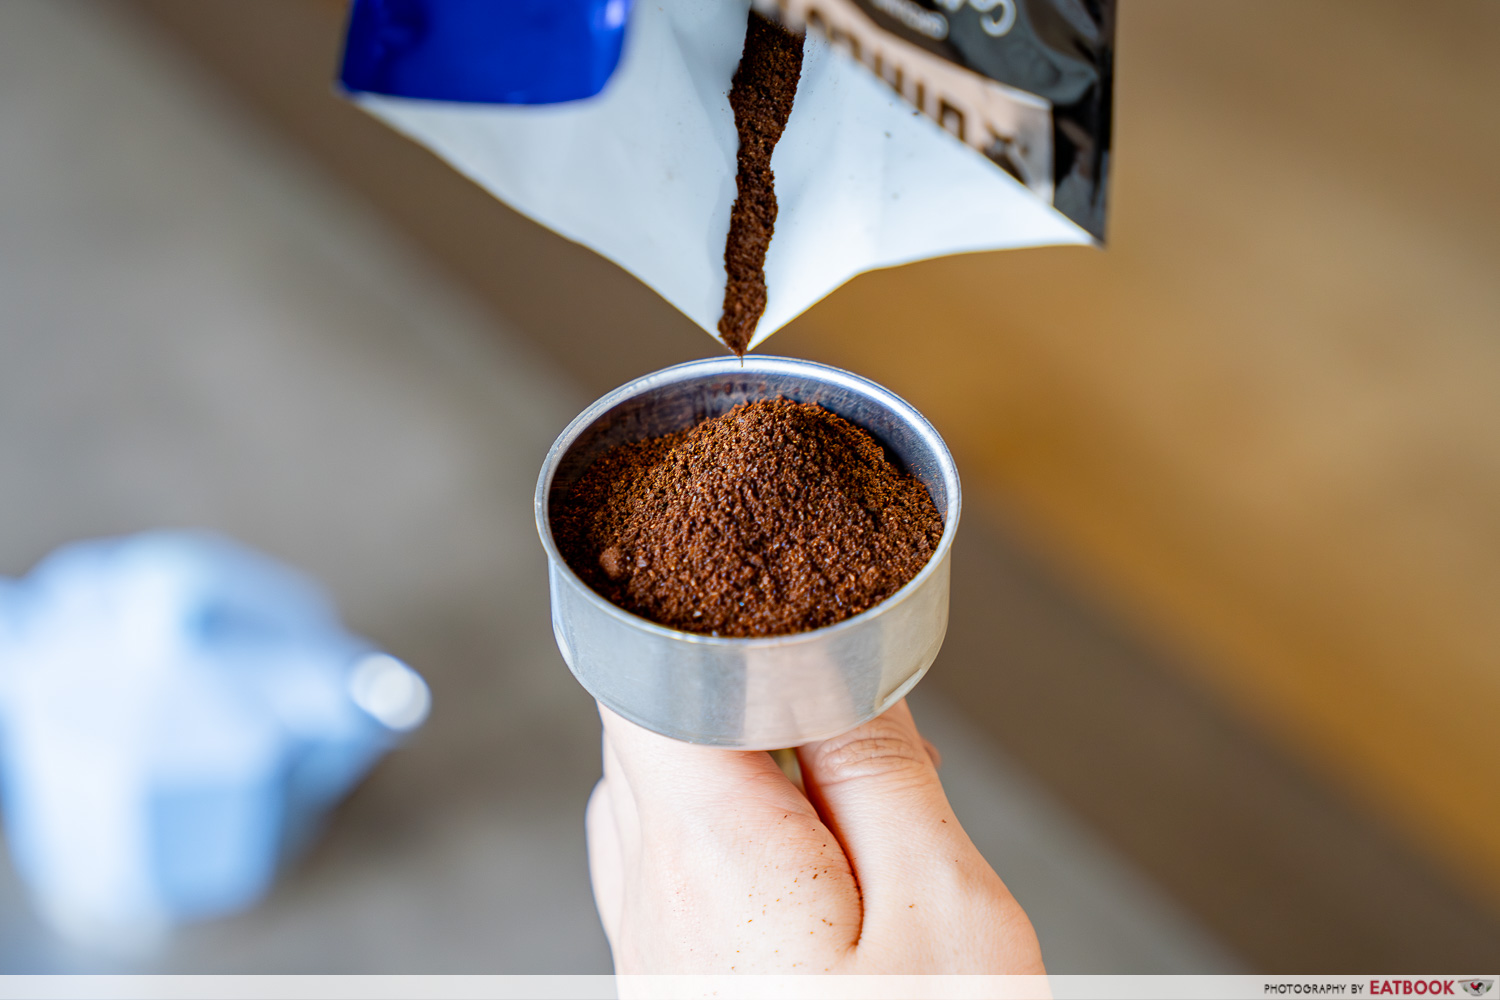
1. Fill the bottom chamber with fresh, cold water to the steam release valve.
2. Add finely ground coffee (about 1 tablespoon per 6 ounces of water) to the filter basket in the middle chamber.
3. Assemble the Moka pot by securing all parts tightly together.
Brewing:
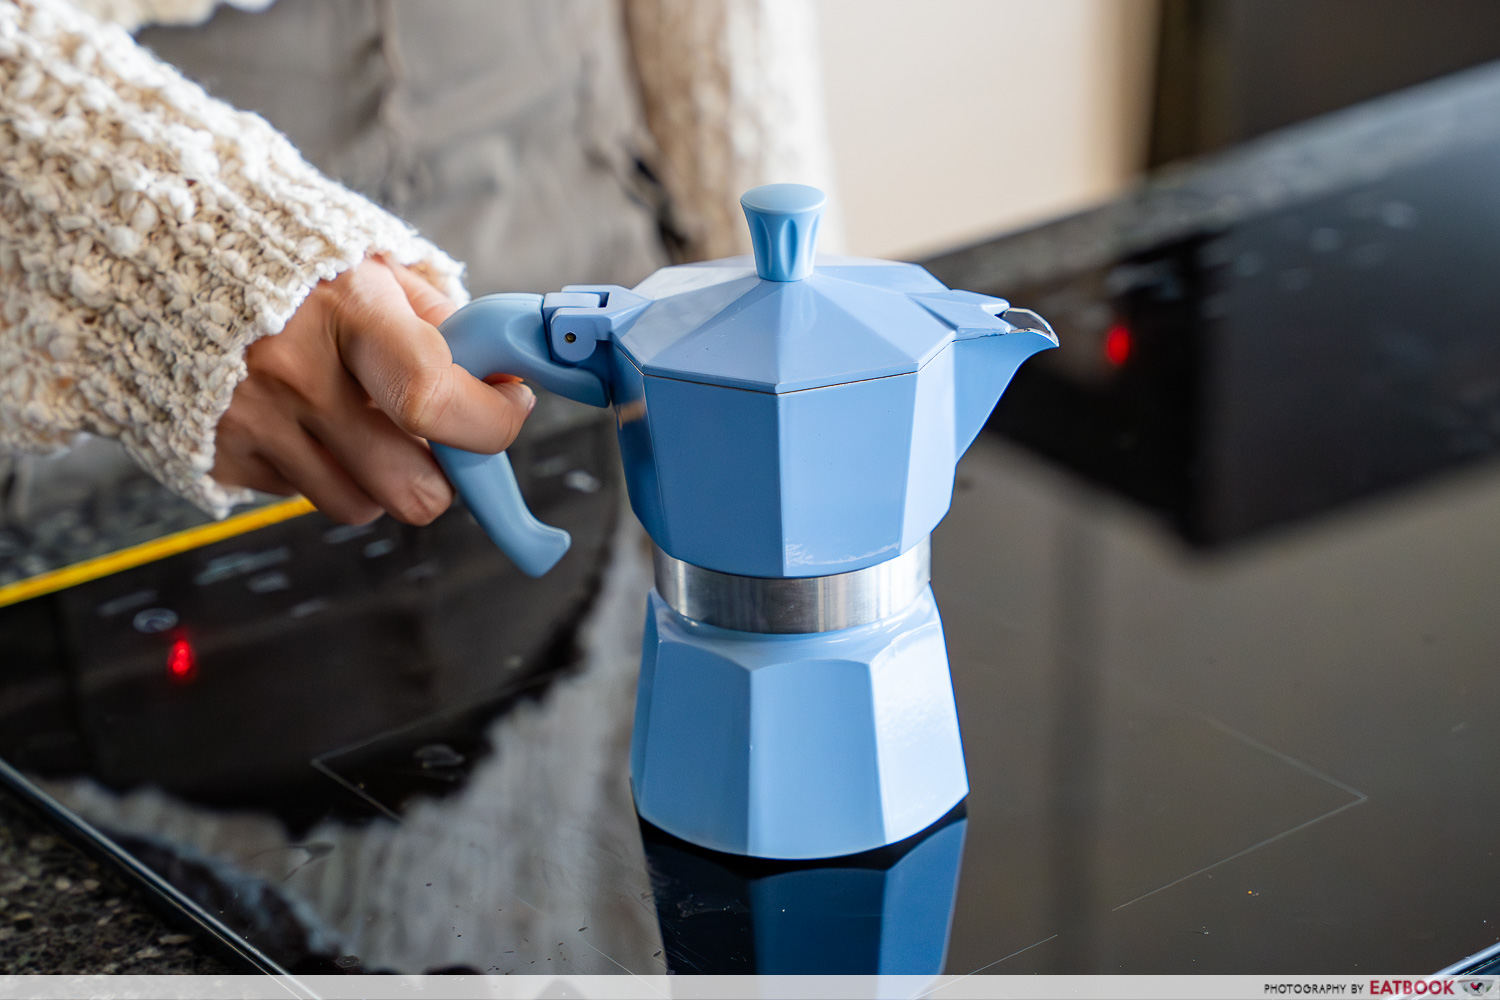
4. Place the Moka pot on the stovetop over medium heat.
5. As the water heats up, steam pressure builds in the bottom chamber and forces hot water up through the steam tube and coffee grounds.
6. You’ll hear a gurgling sound as the coffee begins to brew and collect in the top chamber.
Extraction:

7. Once the sound changes to a hissing or bubbling noise, it means the brewing is complete.
8. Remove the Moka pot from the heat to prevent over-extraction.
9. Pour the coffee into your cup and enjoy it while it’s hot.
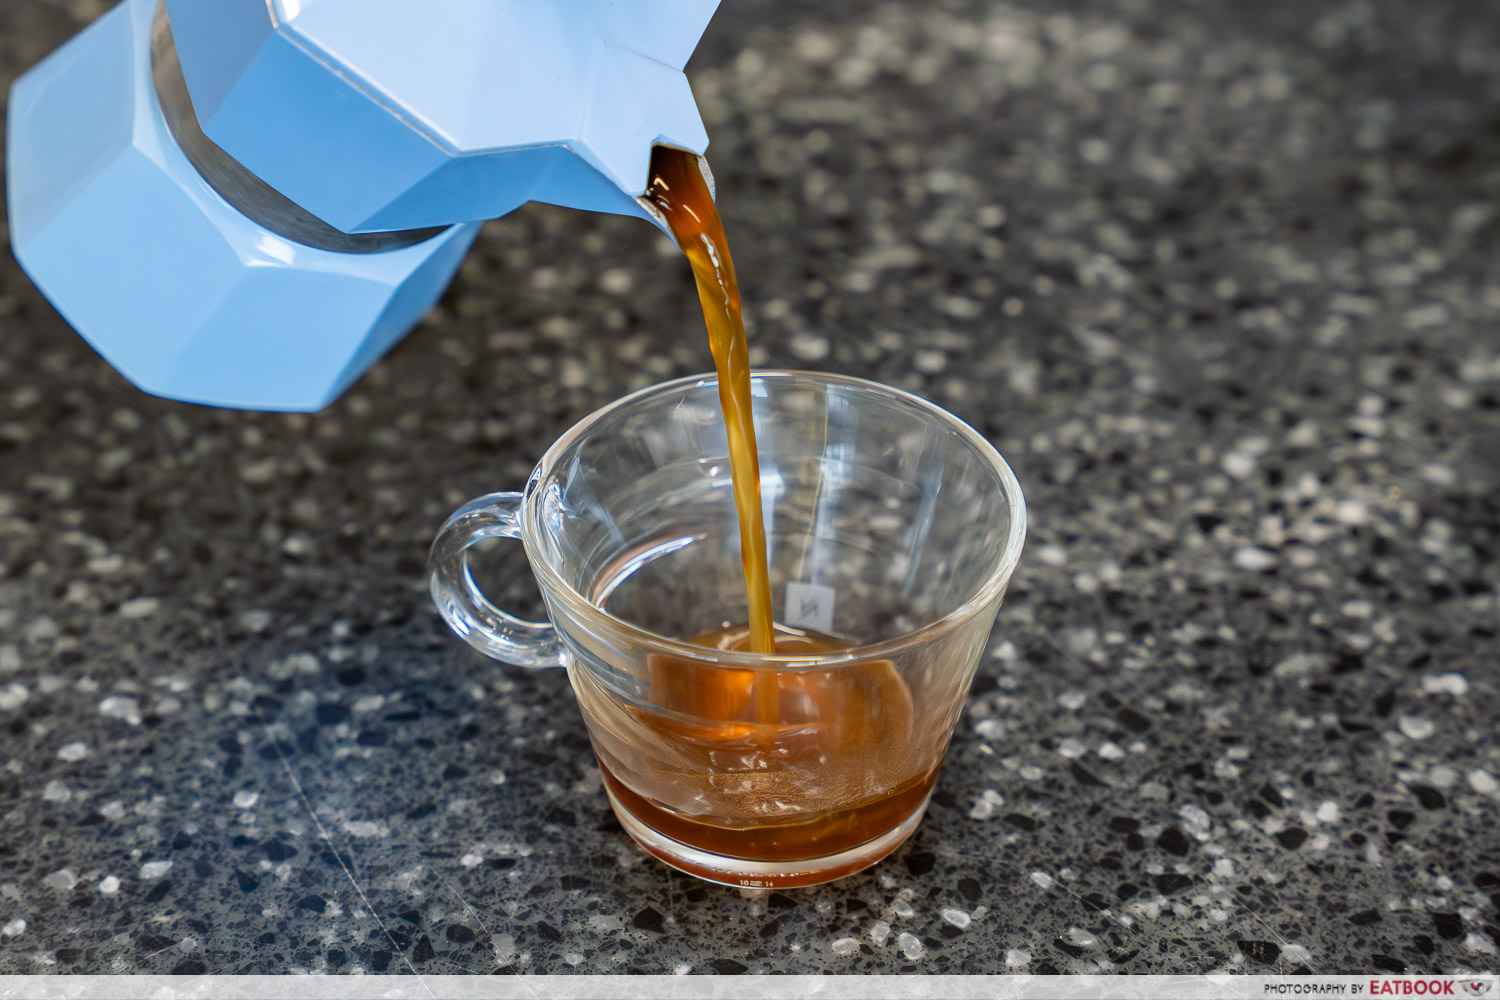
The Moka pot is cost-effective and easy to use with minimal setup, making it a go-to for strong coffee at home. However, it takes a bit of practice to perfect—if the coffee brews too long, it can turn bitter and over-extracted. Mastering the heat and timing is key to getting a rich, smooth cup without the harshness.
It’s also important to note that traditional models are typically made for use over an open flame. So, if you’re using an induction stove, make sure to get a compatible Moka pot.
Pros:
- As close as you can get to an espresso without an espresso-machine
- Affordable and durable
- Some brands sell moka pots with exclusive designs and colourways to suit your home decor
Cons:
- Coffee can be over-extracted easily, needs close monitoring
- Needs time to master brewing with a moka pot, not beginner-friendly
Best for: Those who enjoy a bold, espresso-like coffee.
Order a Moka Pot ($69.80) on Amazon.
6. Cold Brew (Infusion Coffee)
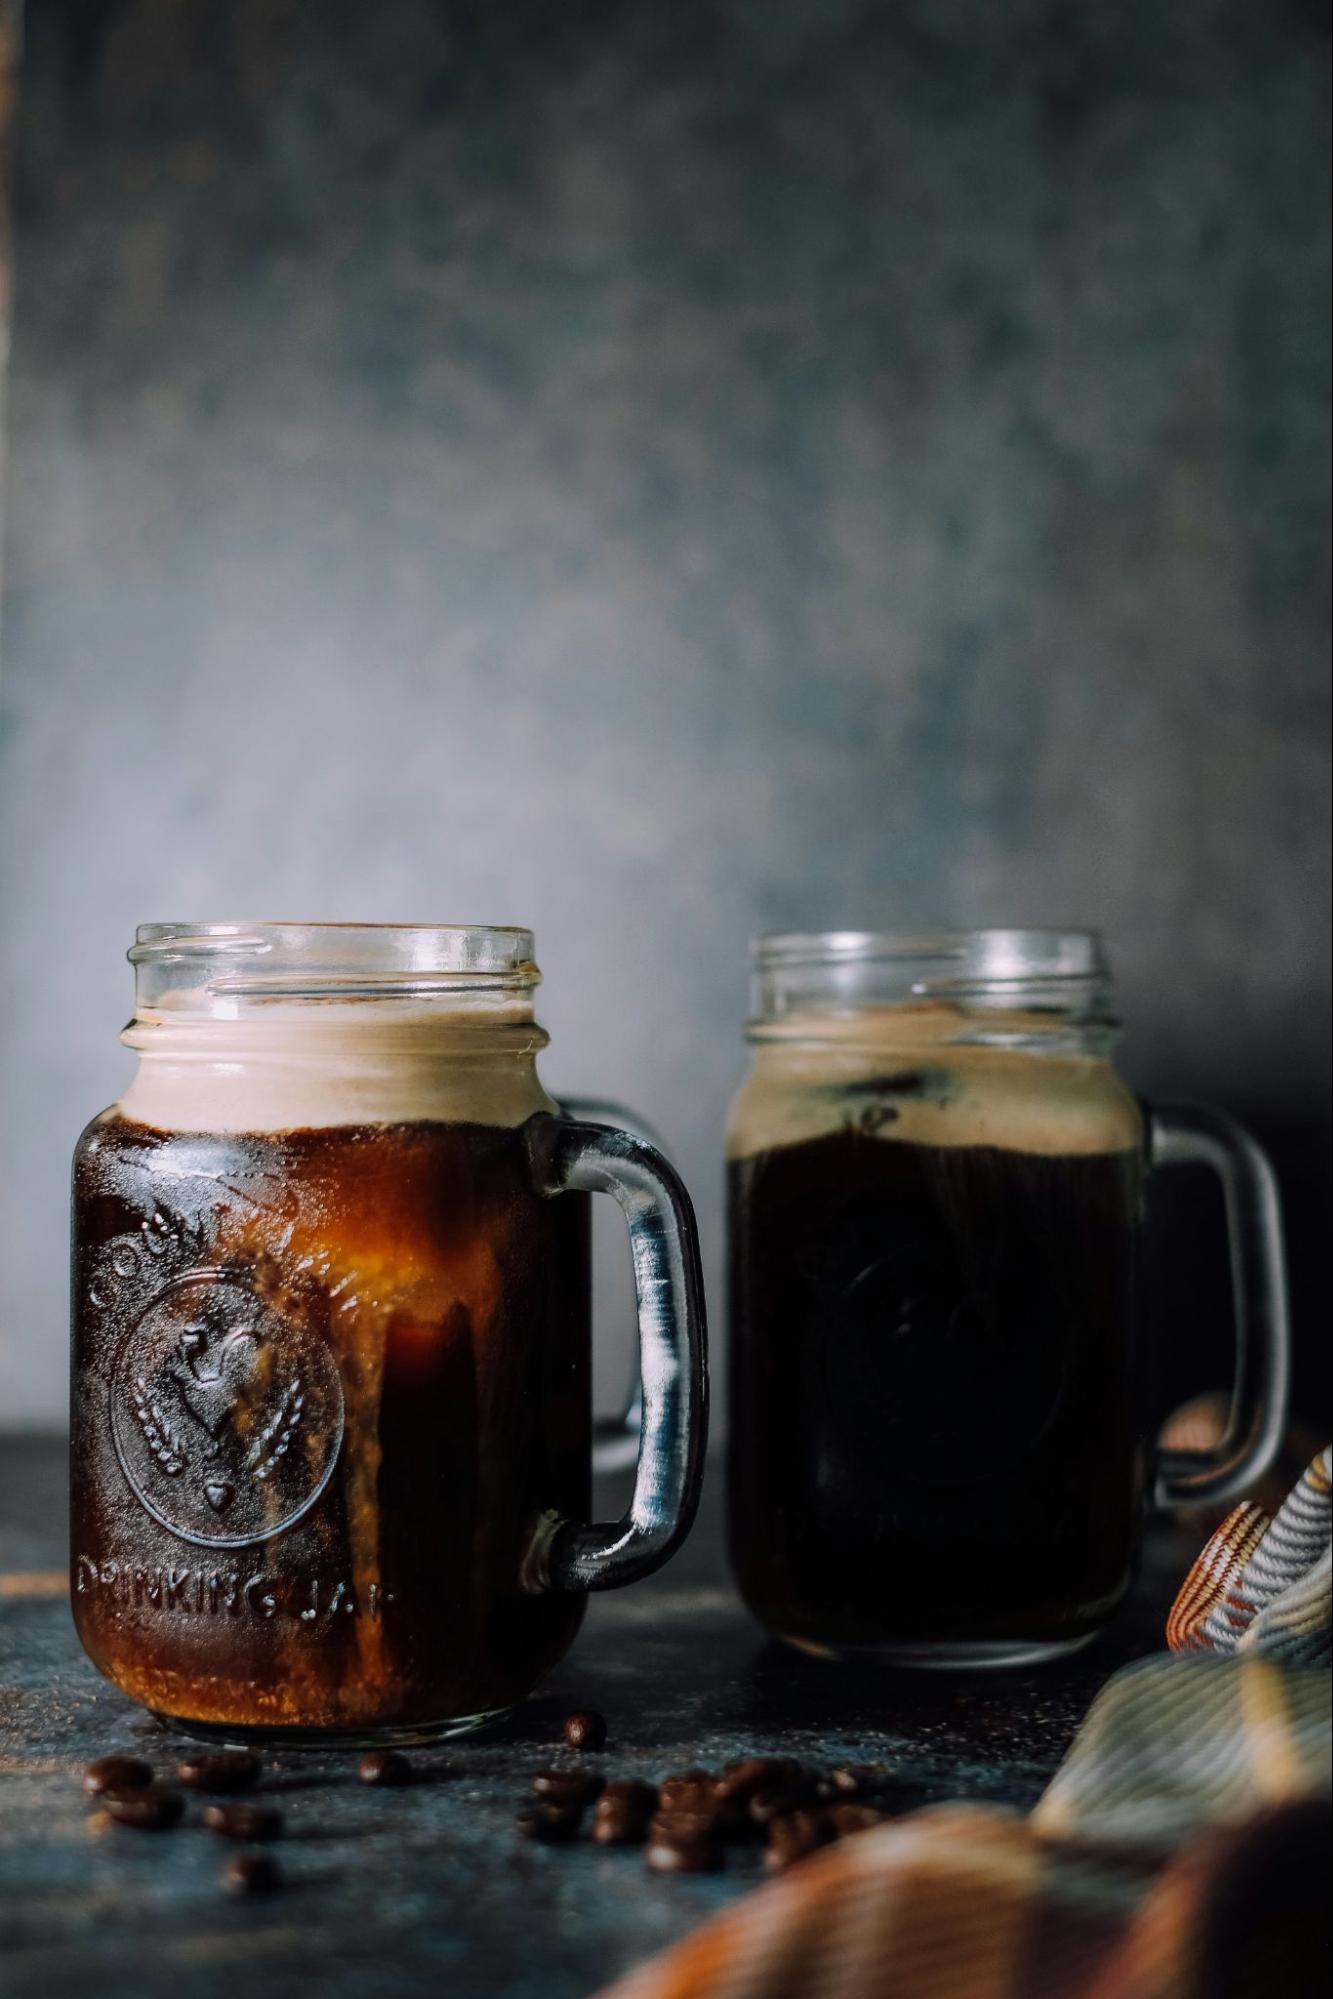
Image: Unsplash
When the weather’s sweltering, nothing hits the spot like a cold brew. It’s become a go-to order at cafes in Singapore, loved for its smooth, slightly sweet taste with less bitterness compared to hot-brewed coffee. The secret lies in its slow steeping process, which extracts flavours gently and results in a low-acidity coffee concentrate.
You don’t even need any fancy gear to make cold brew at home. A French press, simple cold brew kit from brands like Hario, or even repurposed mason jar will do the trick.
How to make a cold brew coffee
Preparation:
1. Use a coarse grind (like coarse cornmeal) to prevent over-extraction and keep the texture smooth.
2. Mix coffee grounds with cold or room-temperature water in your container of choice. Adjust ratios according to your preference:
- 1:4 to 1:5 for a strong concentrate.
- 1:8 for a balanced brew.
- 1:10 to 1:15 for a lighter flavour.
Brewing:
3. Let the mixture steep for 12 to 24 hours at room temperature or in the fridge.
Extraction:
4. Strain the coffee through a fine-mesh filter or cheesecloth to remove the grounds.
5. Serve over ice, and dilute with water or milk to taste.
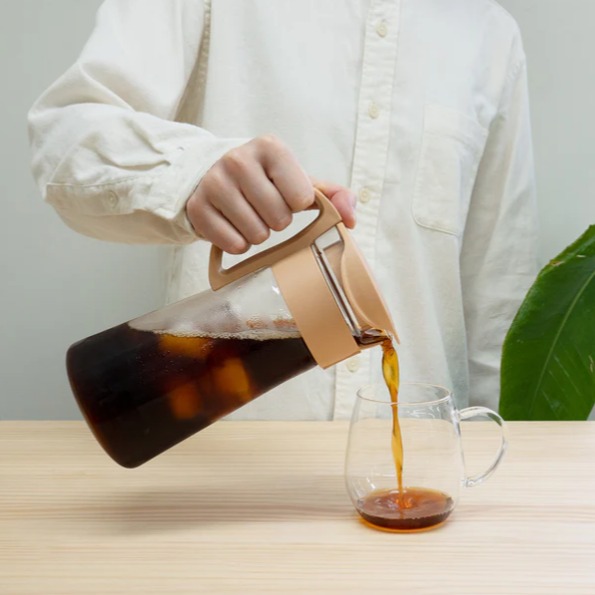
Image: @brewedbyhand
The beauty of cold brew lies in its smooth, low-acid profile and long shelf life—you can make a big batch and enjoy it for up to a week. Plus, it’s easy to make without specialised equipment.
However, it does take a long time to brew and requires fridge space for storage. It can also be more expensive due to the high coffee-to-water ratio. And because cold brewing doesn’t extract as many complex flavour compounds as hot methods, the taste can be a bit one-dimensional.
Pros:
- Low acidity, easy on the stomach
- Can brew big batches that lasts for days
- No fancy gear needed, can use a mason jar to brew
Cons:
- Takes a long time, at least 12 hours
- Less complex than hot brewed coffees
- Needs fridge space
- Requires coarsely ground coffee, not ideal if you don’t own a grinder
Best for: People who love smooth, naturally sweet iced coffee with low acidity.
Order a Hario Cold Brew coffee pot ($19.87) from Amazon.
Which is the right coffee brewing method for you? A summary
If you’ve made it this far into the guide, congratulations, you’re now a certified coffee pro. But with so many methods to choose from, how do you know which one is right for you? Read on for a quick guide to help you pick the best brewing method based on your strength preference, brew time, how beginner-friendly it is, whether it can make multiple cups of coffee, and price point:
| Brewing method | Strength of brew | Brew time | Beginner-friendly? | Makes multiple cups? | Price |
| Moka Pot | Full-bodied, similar to an espresso | Fast, under 4 minutes | No | Yes | ~$70 |
| Aeropress | Can brew light and full-bodied coffees | Fast, 2 minutes | Yes | No | ~$70 |
| French Press | Bold and rich | Low-effort, but takes up to 6 minutes | Yes | Yes | Affordable, under $20 options available |
| V60 | Clean and nuanced | Fast but fussy, 3 to 4 minutes | No | No | Around $100 for a full kit |
| Chemex | No | Yes | |||
| Cold Brew | Low acidity | Long brew time, at least 12 hours | Yes | Yes | Cheapest version, cold brew kits are under $20 |
If you’re looking to bite the bullet and shop for your new coffee brewing kit, check our curated list of coffee essentials on Amazon.
Photos taken by John Lery Villanueva.
A portion of this content contains referral links where Eatbook may collect a commission. Our opinions remain our own.
Drop us your email so you won't miss the latest news.
