No-bake cake recipes that still look professional
We’ve been feeling a little #FOMO while scrolling past home-baked cheesecakes and brownies on our IG feed all month. If you’re missing out on all the baking action due to the lack of an oven, we’ve compiled a list of no-bake cake recipes so you can join in on the hype. Scroll down for beginner-level no-bake cake recipes for cheesecakes as well as moist cakes made with a rice cooker!
No-bake Rice Cooker Cake Recipes
1. Banana Cake

Image credit: @hooray_hrk
Few baked treats smell as tantalising as warm, caramelised banana bread that is fresh out of the oven. With a rice cooker, this Banana Cake recipe will also let you flood your kitchen with waves of that heavenly scent.
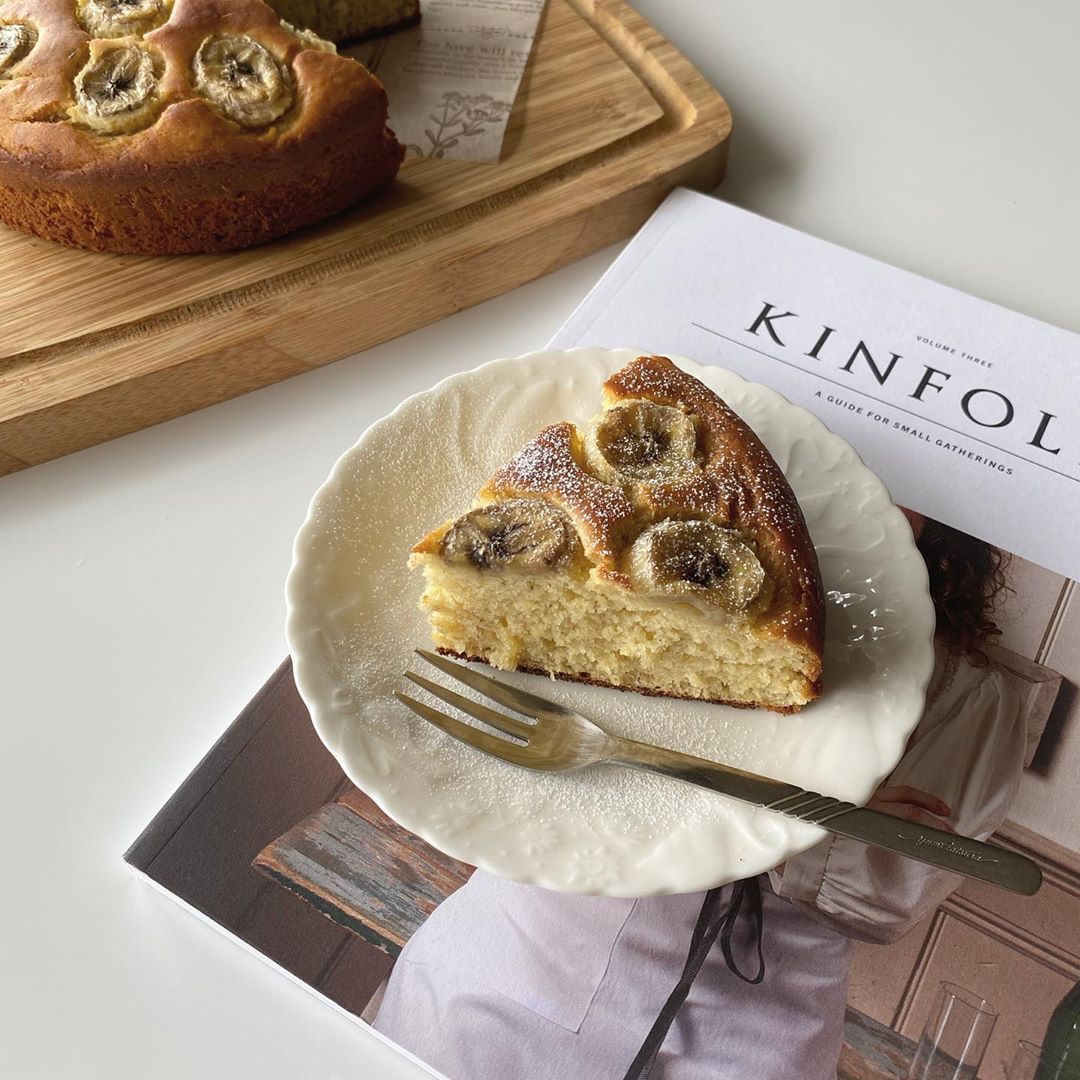
Image credit: @_01.mmm
Pro tip: for a stronger banana aroma, use very ripe bananas. Bananas that are completely browned and too soft to eat on their own are perfect for banana bread recipes.
This recipe is adapted to be cooked in a rice cooker that has a capacity to cook 5½ cups or one litre of rice. Most newer models of rice cookers have a ‘cake’ function, but if you have an older rice cooker, you can just use the regular ‘cook’ function and run it on multiple cycles till your cake is ready.
Yield: Serves 8
Time needed: 20 minutes
Ingredients
3 eggs, beaten
110g sugar
110g butter
200g very ripe bananas, mashed
160g plain flour
¾ tsp baking powder
¾ tsp baking soda
⅛ tsp salt
Banana slices (optional)
Icing sugar (optional)
Steps:
- In a saucepan over medium heat, melt butter and sugar together. Set aside to cool.
- Whisk beaten eggs into the cooled butter and sugar. Add in mashed bananas and stir well.
- Sift in flour, baking powder, baking soda, and salt into the mixture. Fold the wet and dry ingredients together till well-combined.
- Generously grease the interior of the rice cooker pot with butter. Place extra slices of banana at the bottom of the pot for decoration. Pour the batter into the pot.
- Press the ‘Cook’ button and let it run for three cycles or 60 minutes. Insert a toothpick into the middle of the cake. If it comes out with wet batter, give it more time in the rice cooker. If it comes out clean, the cake is done.
- When the cake is completely cooked, turn off the rice cooker and let the cake rest inside for around 30 minutes, with the lid of the cooker open.
- Flip the cake out onto a plate then dust with icing sugar.
Recipe adapted from Everybody Eats Well In Flanders‘ post.
2. Apple Upside-Down Cake
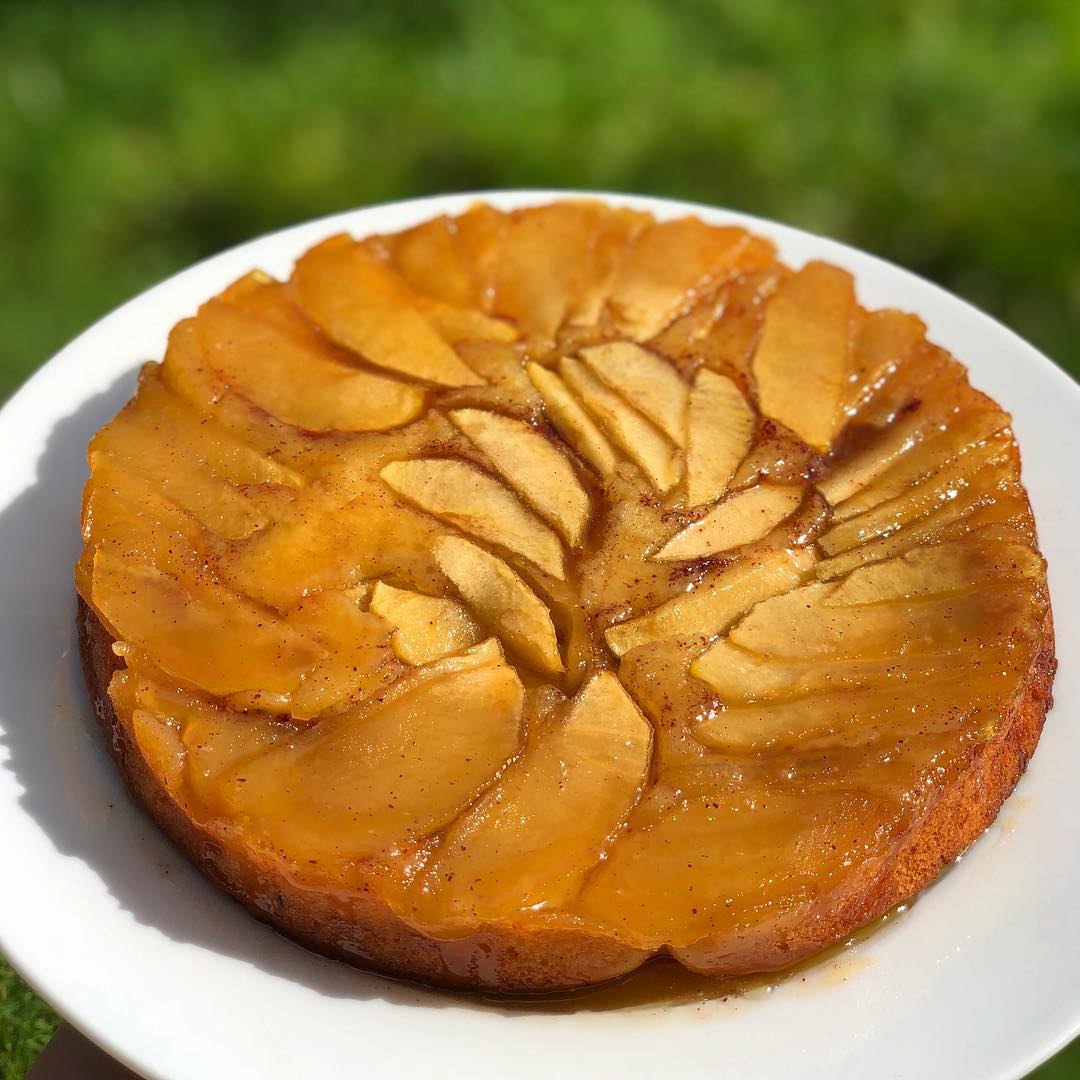
Image credit: @mariadumas
This Apple Upside-Down Cake is the underrated sibling of the old-school pineapple upside-down cake. A cross between a caramel apple and a warm spice cake, this moist sponge cake is crowned with a juicy layer of apple slices, and can be baked entirely in a rice cooker.

Image credit: @fain.dining
Take the chance to make a beautiful, IG-worthy apple cake by laying your apple slices in a neat pattern.
Yield: Serves 8
Time needed: 30 minutes
Ingredients
Honey apple slices:
1 apple, sliced
1 cinnamon stick
2 tbsp honey
Wet ingredients:
3 eggs, whites and yolks separated
3 tbsp sugar
40g melted butter
3 tbsp milk
1 tsp vanilla extract
Dry ingredients:
¾ cup plain flour
¾ tsp baking powder
⅛ tsp salt
Steps:
- In a saucepan over low heat, cook the apple slices, cinnamon stick, and honey until the apples have softened slightly. Set aside and let cool.
- In a clean mixing bowl, whisk egg whites with a hand mixer, adding in the sugar in batches. Stop when medium peaks form.
- In a separate bowl, whisk egg yolks, melted butter, milk, and vanilla extract. Stir this mixture into the egg whites in two batches.
- Sift all the dry ingredients into the mixture and fold gently till well-combined.
- Generously grease the interior of a rice cooker pot with butter. Lay down the apple slices neatly till they cover the bottom of the pot, and set aside the leftover sauce from cooking the apples. Pour in the cake batter.
- Press the ‘Cook’ button and let it run for three cycles, or at least an hour. Insert a toothpick into the middle of the cake. If it comes out with wet batter, give it more time in the rice cooker. If it comes out clean, the cake is done.
- Carefully flip the cake out onto a plate, then lightly brush the top of the cake with the reserved apple sauce.
Recipe adapted from Daily Cooking Quest‘s post.
3. Japanese Cotton Cheesecake

Image credit: @b_cakes5
Baking cakes in rice cookers has been a growing trend in South Korea and Japan, since it is more common for households to own a rice cooker than a working oven. This fluffy Japanese Cotton Cheesecake celebrates the magic of a single-pot recipe, because you can recreate the same unique pillowy texture without needing to fiddle with oven temperatures or fancy baking pans.
Yield: Serves 8
Time needed: 20 minutes
Ingredients
1 block or 225g cream cheese
2 eggs, whites and yolks separated
80g castor sugar
2 tbsp lemon juice
40g cake flour
200ml milk
Icing sugar (optional)
Steps:
- Cut cream cheese into small cubes and let it soften completely at room temperature. Using a whisk or hand mixer, whisk the cream cheese until completely smooth.
- Add in egg yolks, sugar and lemon juice. Whisk until everything is combined thoroughly with no lumps.
- Sift cake flour into the mixture and mix until fully incorporated. Pour in milk and whisk until smooth.
- In a clean bowl using clean hand mixer attachments, whisk the egg whites on high speed until stiff peaks form. Gently fold the egg whites into the cream cheese mixture in three batches.
- Generously grease the interior of the rice cooker pot with butter. Pour the batter into the pot.
- Close the lid of the rice cooker, select the ‘Cake’ function, and press “Start”. Alternatively, set older rice cooker models on the ‘Cook’ function and run it for two cycles, checking between cycles. Insert a toothpick into the middle of the cake. If it comes out with wet batter, give it more time in the rice cooker. If it comes out clean, the cake is done. The cake should also be pulling away from the sides of the pot and the surface should have an even brown colour.
- When the cake is completely cooked, turn off the rice cooker and let the cake rest inside for around 30 minutes, with the lid of the cooker open.
- Take out the pot and place a flat plate over it. Carefully invert the pot and the cake should slide down onto the plate. Refrigerate for at least one hour.
- Dust with icing sugar before serving.
Recipe adapted from What To Cook Today‘s post.
Other No-bake Cake Recipes
4. Chocolate Mousse Cake
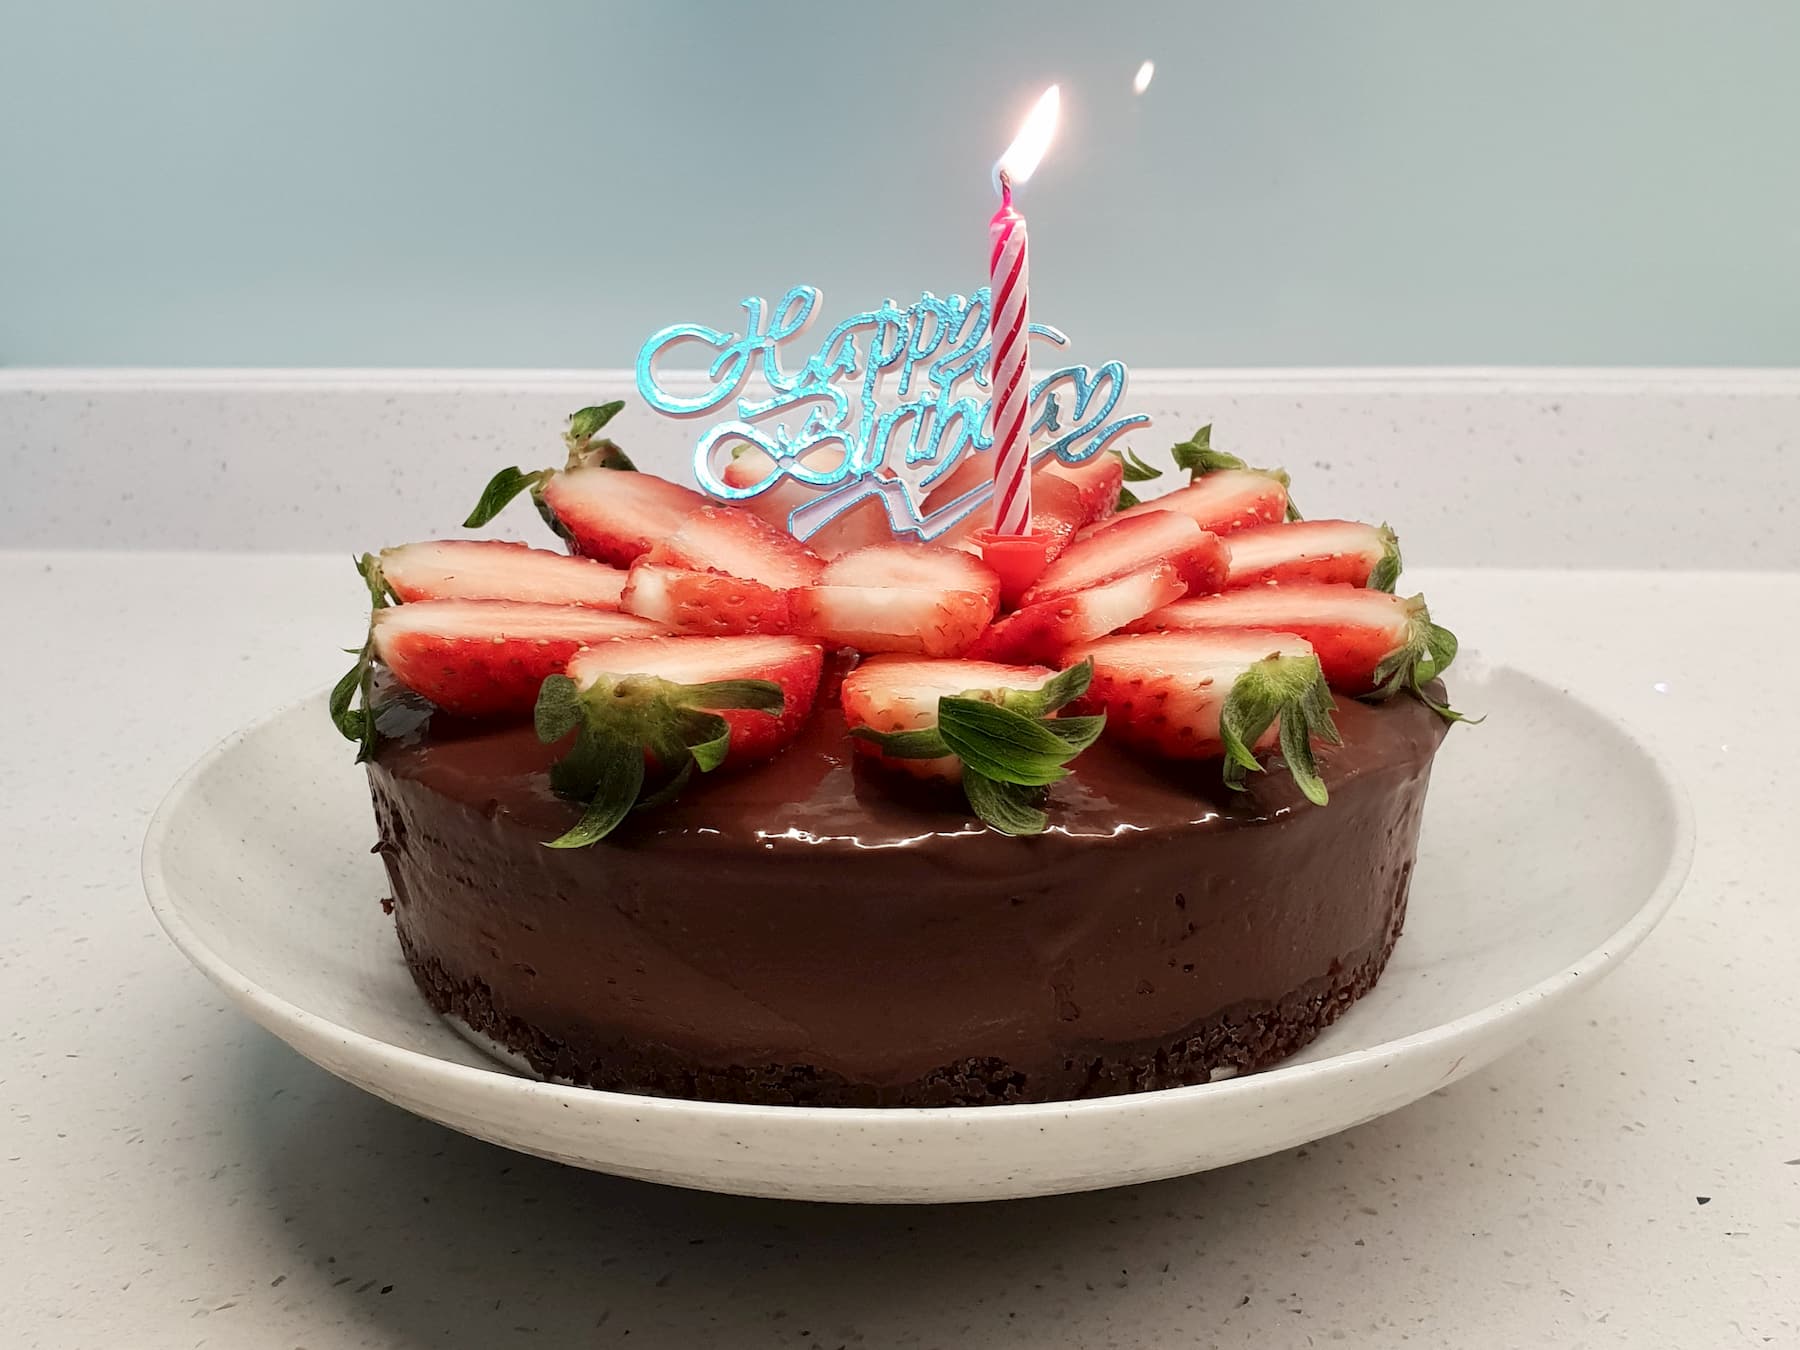
Image credit: @hullokityee
This is a gelatin-free Chocolate Mousse Cake recipe that gives you a buttery cookie crust, layered with decadent dark chocolate mousse and a shiny ganache top. Most mousse cake recipes call for gelatin to allow the cake to hold its shape. In place of that, we combined custard with melted chocolate and refrigerated the mousse for at least six hours to allow it to firm up.
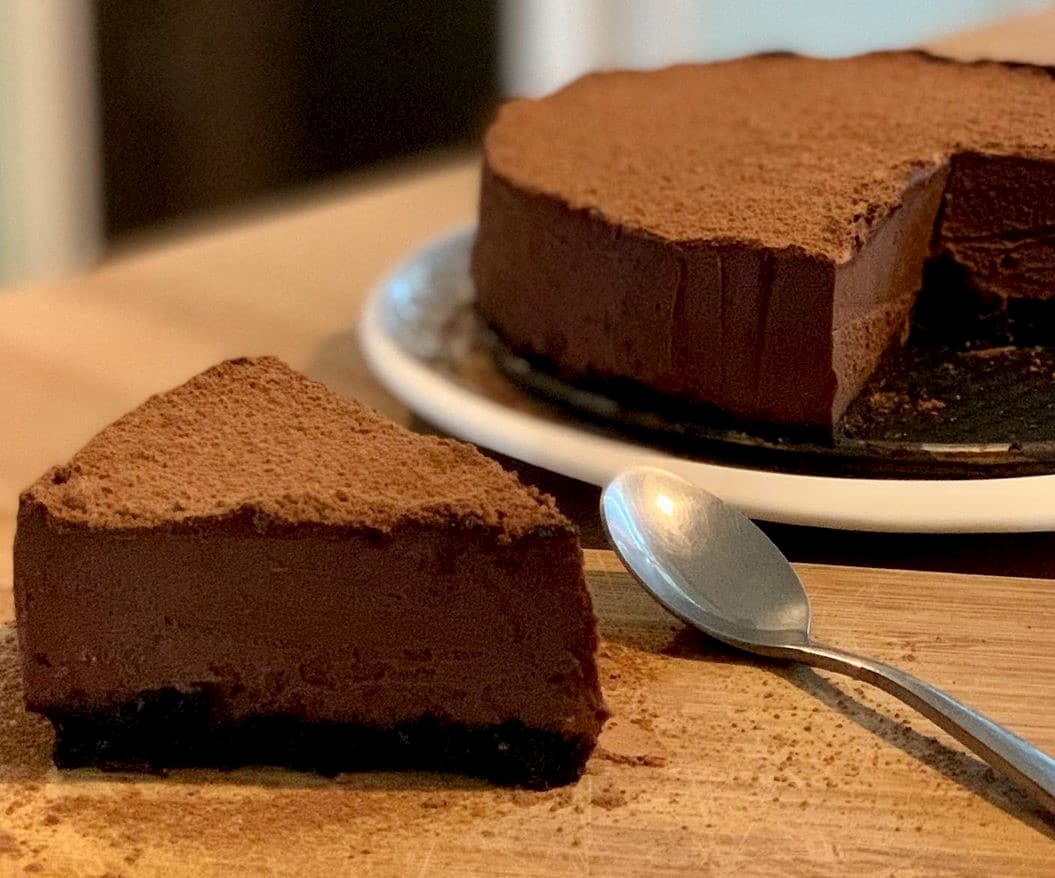
Image credit: @pipair
Be sure to use good quality dark chocolate for a more intense cocoa flavour. Feel free to decorate the chocolate mousse cake with fresh fruit to balance out the richness of the cake, or go all the way with the chocolate flavour and dust the top with cocoa powder.
Yield: Serves 6
Time needed: 30 minutes
Ingredients
Crust:
90g Lotus Biscoff cookies, crushed
40g unsalted butter, melted
Chocolate mousse:
3 egg yolks
15g sugar
2g vanilla extract
135g heavy whipping cream
200g dark chocolate, coarsely chopped
135g heavy whipping cream
30g icing sugar
Ganache:
50g dark chocolate, finely chopped
50g heavy whipping cream
Steps:
- In a bowl, combine crushed Lotus Biscoff cookies and melted butter. Mix thoroughly, then press into a 6-inch, removable-base cake pan. Refrigerate while you prepare the chocolate mousse.
- Combine egg yolks, sugar, vanilla extract and heavy whipping cream in a saucepan and stir well.
- Place the saucepan over medium-low heat. Keep stirring until small bubbles start to appear and turn off the heat when the mixture is slightly thickened.
- Add in the dark chocolate chunks and mix until the chocolate is fully melted. Place in the refrigerator to cool.
- In a separate bowl, whisk cold whipping cream together with icing sugar till soft peaks form. Pour in the dark chocolate mixture and whisk until fully combined with the cream.
- Transfer the mousse into the cake pan and smooth out the surface with a spatula. Refrigerate for at least six hours.
- To prepare the ganache, place finely chopped dark chocolate and heavy whipping cream into a microwave-safe bowl. Microwave for 30 seconds, then stir till the chocolate and cream are fully combined.
- Without removing the cake from the pan, pour the ganache over the chilled cake. Smooth out the surface again with a spatula, then place it back in the freezer for 30 minutes.
- Decorate the cake with strawberries or dust with cocoa powder.
Recipe adapted from Cooking Tree‘s video.
5. No-Oven Castella Cake
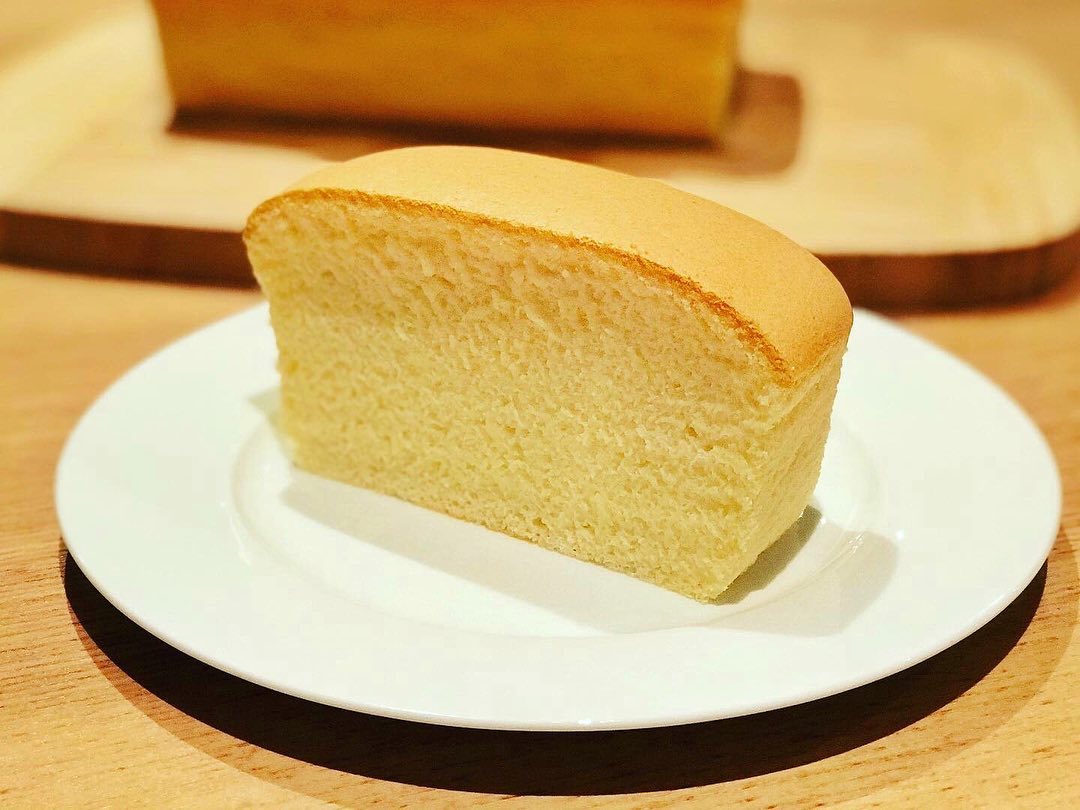
Image credit: @michaelliu1126
No worries if you don’t own an oven. This No-Oven Castella Cake can be entirely baked on a stove top. Traditionally, the castella cake is a fluffy sponge cake popularised in Japan and Taiwan. This stovetop version has more of a spongy texture than the classic castella, but it still has the characteristic light-brown skin on the surface.
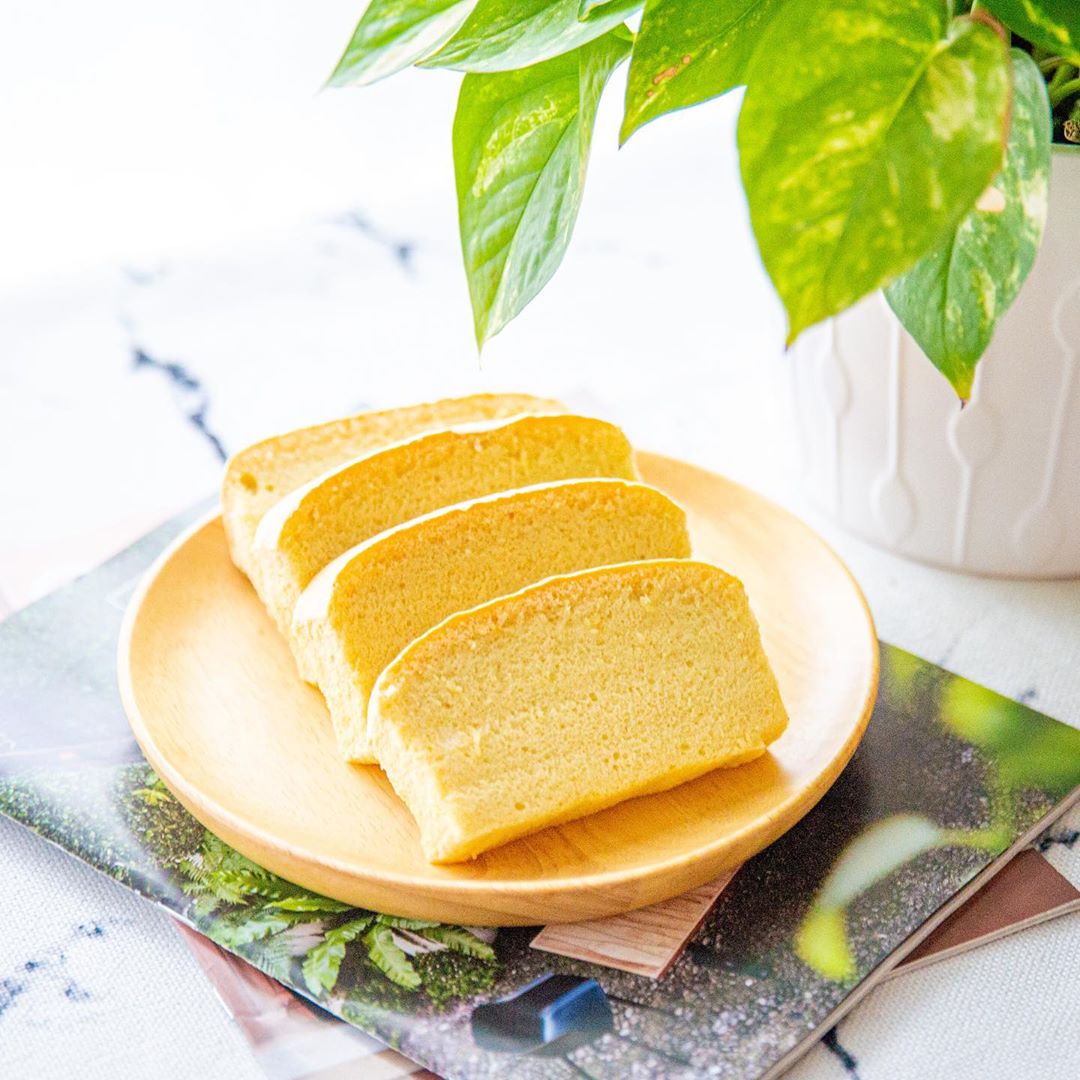
Image credit: @jie_homemade
We recommend using a good quality, heavy-bottom saucepan in order to cook the cake evenly. The size and material of your saucepan may cause cooking times to vary, so do check the doneness of the cake from time to time, especially when nearing the 50-minute mark.
Yield: Serves 8
Time needed: 20 minutes
Ingredients
Butter to grease the pan
20g flavourless vegetable oil
16g milk, at room temperature
5g vanilla extract
4 egg whites, at room temperature
100g sugar
5 egg yolks
80g plain flour
⅛ tsp salt
Steps:
- Prepare a tall, 6-inch saucepan by greasing the sides with butter. Line the sides as well as the bottom of the pan with parchment paper.
- In a bowl, combine vegetable oil, milk and vanilla extract. Set aside for later.
- In a clean bowl, whisk egg whites at low speed for 30 seconds till slightly frothy. Add in the sugar in batches and stop whisking when the mixture has turned glossy with stiff peaks.
- Lightly beat egg yolks in a separate bowl, then fold it into the whipped egg whites.
- Sift plain flour and salt into the egg mixture and gently fold in once more until fully combined.
- Spoon half of the batter into the vegetable oil mixture and stir well to combine. Then pour that entire mixture back into the batter and fold together.
- Pour the batter into the prepared saucepan and lightly swirl a chopstick around the batter and tap the cake on the counter to release air bubbles. Use the chopstick to burst any large air bubbles near the surface.
- Place the saucepan over the lowest possible heat on your stove. Cover the pan and let it cook for 50 to 60 minutes. If steam gathers on the bottom of the lid, clean it off with a dry towel occasionally.
- Check if the cake is fully cooked by inserting a toothpick into the middle of the cake. If it comes out with wet batter, give it more time in the rice cooker. If it comes out clean, the cake is done.
- Flip the cake out onto a plate, then line the bottom of the pan with another piece of parchment paper. Put the cake back into the saucepan and cook for another 10 minutes on low heat, to brown the bottom of the cake.
- Let the cake cool completely, then peel off the parchment paper and cut it into slices.
Recipe adapted from Cooking Tree‘s video.
6. Tiramisu
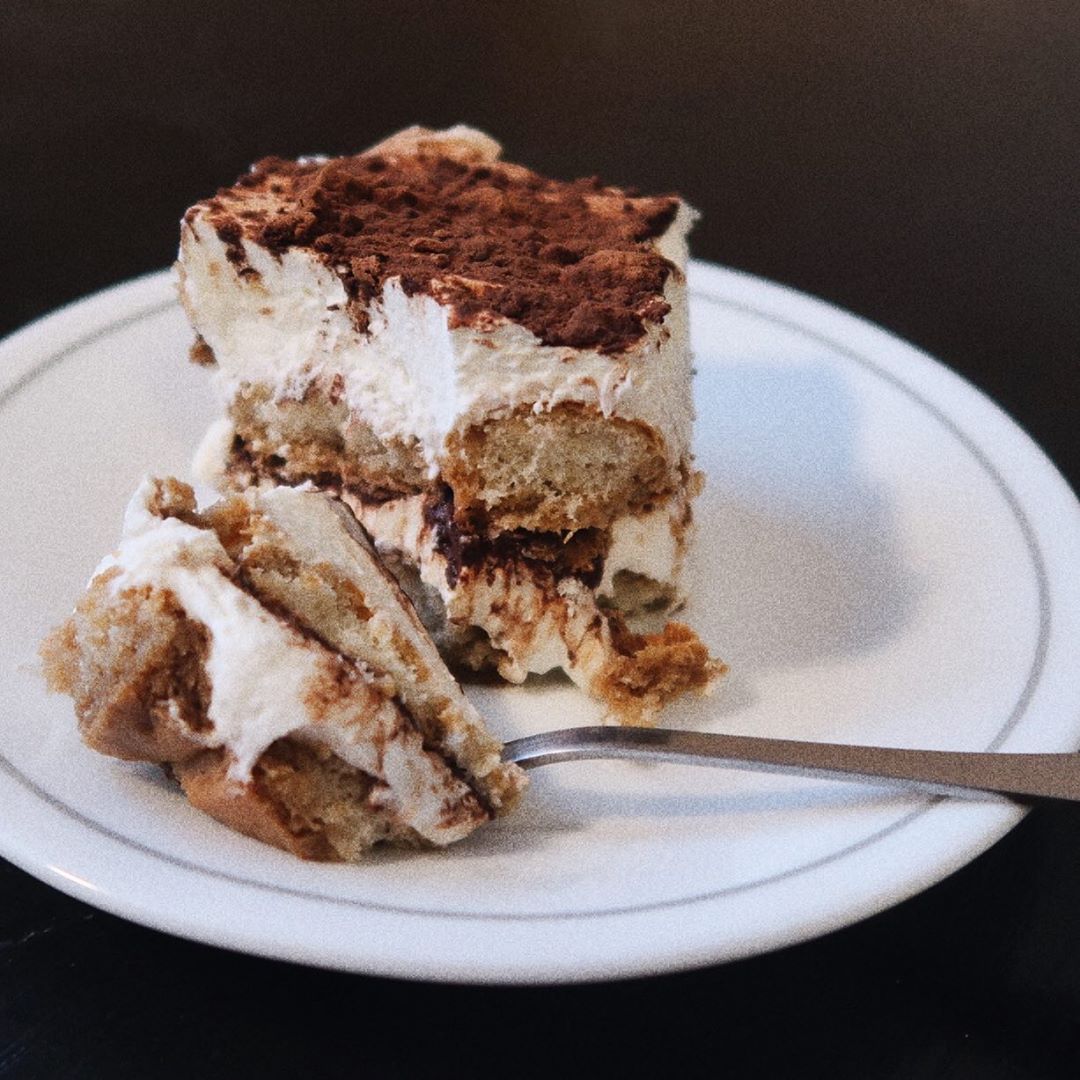
Image credit: @opeitsmay
There’s no argument that Tiramisu is the quintessential no-bake dessert. This classic Italian cake is creamy, light, and infused with the robust flavours of coffee and liqueur. Constructed with alternating layers of moist sponge and cream cheese, the no-bake version of this dessert calls for store-bought ladyfinger biscuits that you can easily find in supermarkets.

Image credit: @bindibakeryby
Most traditional recipes favour mascarpone cheese over American cream cheese for its higher fat content and richness. But if you don’t have mascarpone on hand, you can just use regular cream cheese, or a combination of 185g of cream cheese and 40g of heavy whipping cream.
Yield: Serves 9
Time needed: 20 minutes
Ingredients
Mascarpone cream:
1 ½ cups heavy whipping cream
⅓ cup sugar
1 tsp vanilla extract
225g mascarpone cheese
Coffee mixture
1½ cups cold espresso
3 tbsp coffee-flavoured liqueur, rum or brandy
1 package ladyfinger biscuits
Cocoa powder
Steps:
- In a large mixing bowl, whisk cold heavy whipping cream on medium speed. Gradually add in sugar and vanilla extract and continue beating until stiff peaks form.
- Add softened mascarpone cheese into the cream and continue whisking until well-combined.
- In a shallow bowl, add coffee and liqueur. Dip each ladyfinger biscuit briefly into the coffee mixture.
- In a 8-inch square dish or cake pan, lay down a layer of dipped ladyfingers, then top with half the mascarpone cream. Lay down another layer of ladyfingers, then smooth the remaining mascarpone cream over it.
- Using a sift, dust cocoa powder generously over the tiramisu. Refrigerate for at least four hours or overnight.
Recipe adapted from Bigger Bolder Baking and The Spruce Eats‘ posts.
No-bake Mille Crepe Cake Recipes
7. Triple Milo Crepe Cake
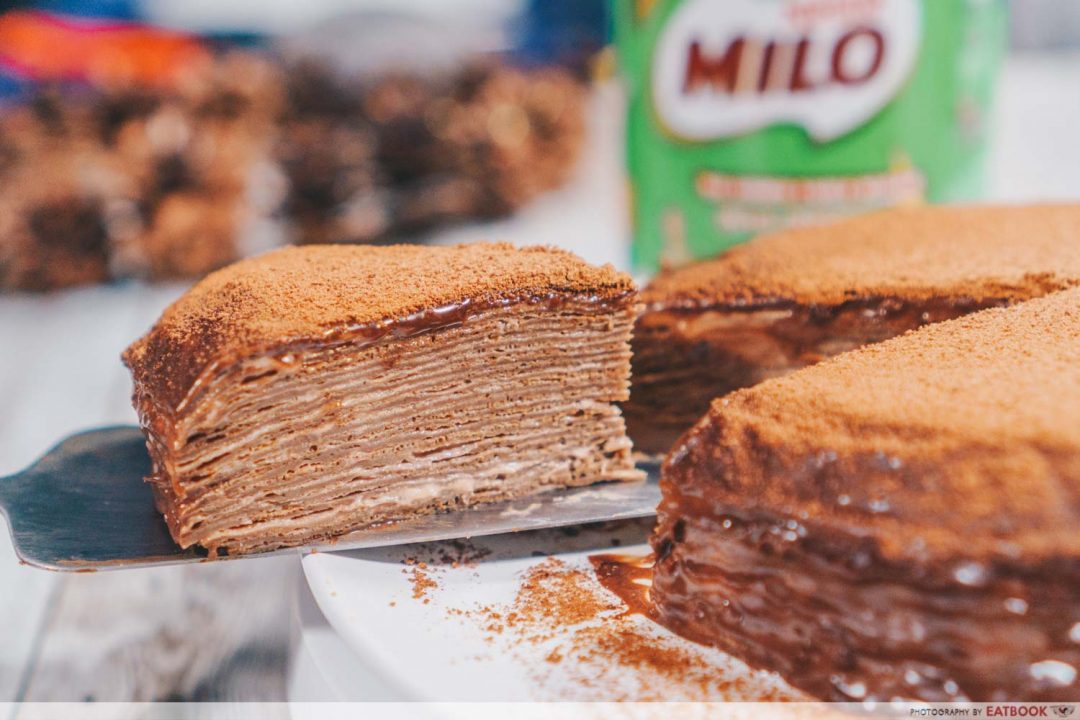
This is the dream cake for all Milo lovers. Our Triple Milo Crepe Cake recipe not only incorporates the comforting breakfast beverage into the crepes, but also the cream filling, and ganache all over. To top it all off, generously dust Milo powder as the finishing step to lend it an appearance that makes the cake look like it was done by a professional.


The secret behind a beautifully constructed crepe cake is all about the baker’s patience and dedication. To cook, spread, and stack all those thin layers to create a cake is certainly time consuming but extremely rewarding.
Check out our step-by-step tutorial for this Milo crepe cake recipe!
Yield: Serves 16
Time needed: 2.5 hours
Ingredients
Wet mix for crepe batter:
6 eggs, room temperature
3 boxes, 200ml Milo UHT packet drink, room temperature
100g unsalted butter, melted
½ tsp vanilla extract
Dry mix for crepe batter:
½ tsp salt
160g cake flour
20g sugar
Milo cream:
240ml heavy whipping cream
2 tbsp sugar
½ cup Milo powder
Milo ganache:
70g semi-sweet chocolate
100ml heavy whipping cream
1 tbsp condensed milk
½ cup Milo powder
Garnish:
2 tbsp Milo powder
Steps:
- To prepare the wet mix, whisk the eggs, melted butter, and vanilla extract.
- To prepare the dry mix, sift the flour, sugar, and salt together in a separate mixing bowl. Beat with a whisk until everything is well combined.
- Pour the wet mix into the dry mix and whisk thoroughly. Strain the crepe batter using a fine strainer before transferring to another clean container. Cover with cling wrap and chill for at least an hour.
- Heat a 10” frying pan on medium-low heat and pour a ¼ cup of crepe batter into it. Cook the crepes for one minute on both sides until they are slightly brown but not crispy.
- Transfer the cooked crepes to a wire rack and let them cool. The batter should give around 23 to 24 crepes. Once you’re done with cooking all of them, cover with cling wrap and chill in the fridge.
- To prepare the Milo cream, whisk the whipping cream with a hand mixer until they develop soft peaks. Add the sugar and Milo powder, and continue to beat until medium peaks form.
- Layer the cake by placing a piece of crepe at the bottom of a cake stand or large plate, layer on a scoop of whipped cream, and continue this process until there are no crepes remaining. There’s no need to apply whipped cream on the top of the final layer.
- Place a round plate on the top of the cake and run a knife around the plate to trim off the edges. Place the cake in the fridge to firm up for at least 30 minutes.
- Prepare the Milo ganache by heating up the cream and condensed milk in a saucepan until it’s almost simmering. In a mixing bowl, pour the heated cream mixture into the chocolate and let it sit for a minute before adding in the Milo powder. Stir the mixture with a whisk until it is thick and smooth.
- Place the chilled cake on top of a wire rack and pour the Milo ganache over the cake and spread evenly. Chill for at least 30 minutes to let the ganache firm up.
- Decorate the cake by sprinkling Milo powder through a fine sieve. You may choose to serve it immediately, but it’s best to chill for at least an hour before serving. Keep the cake covered and you’ll be able to store it in the fridge for at least two days.
8. Matcha Crepe Cake
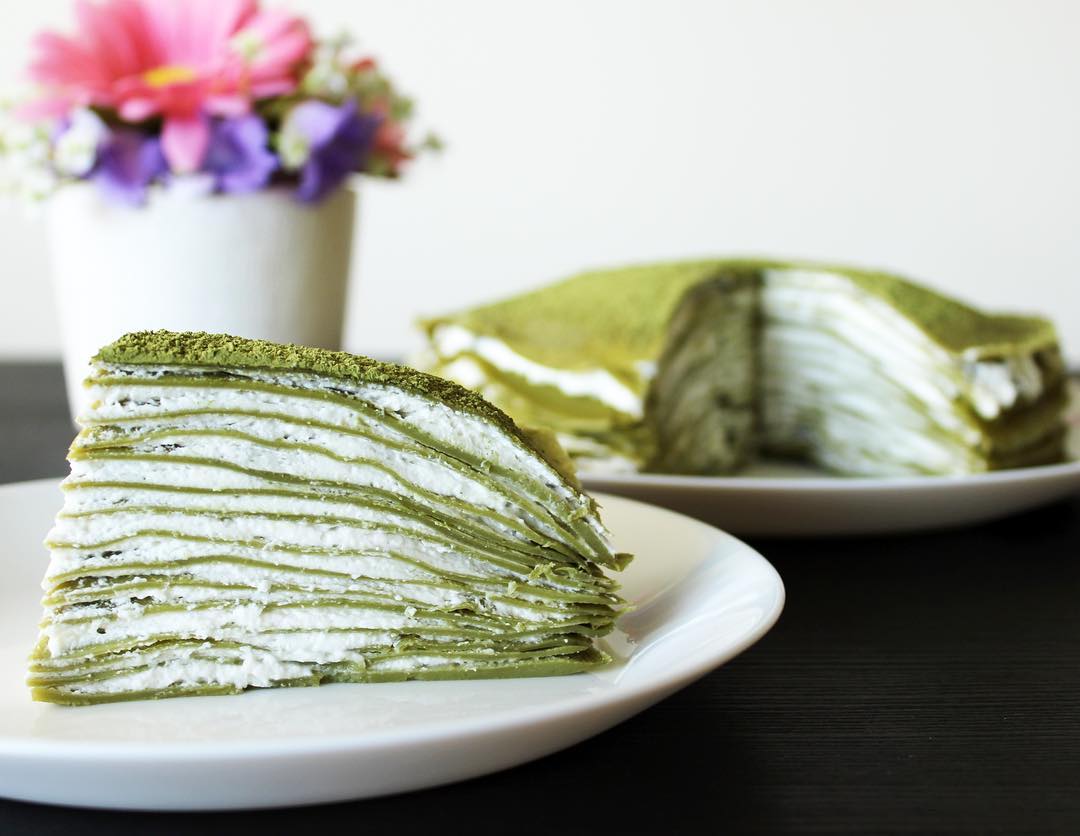
Image credit: @lindulgent_connfections
For those who prefer something less sweet, this elegant Matcha Crepe Cake will win you over with its bittersweet layers of matcha-flavoured crepes and freshly whipped cream. To incorporate a stronger matcha flavour into the stack, simply whisk in an extra tablespoon of matcha powder into the whipped cream.
If you have lots of time on your hands and want a cake creation that you can impress your family with, this delicate and beautiful light green crepe cake definitely fits the bill!
Yield: Serves 16
Time needed: 2.5 hours
Ingredients
Wet mix for crepe batter:
400ml whole milk
3 tbsp sugar
3 eggs
1½ tbsp unsalted butter, melted
Dry mix for crepe batter:
130g cake flour
2 tbsp matcha powder
½ tsp baking powder
Fresh cream
1 cup heavy whipping cream
3 tbsp sugar
Garnish:
1 tbsp matcha powder
Steps:
- Microwave whole milk for 45 seconds to a minute to warm it up. Pour sugar into the warm milk and stir to dissolve.
- In a separate bowl, beat the eggs and slowly pour in the warm milk mixture followed by melted butter while whisking continuously.
- Sift cake flour, matcha powder, and baking powder into the wet mix. Whisk and fold well, ensuring that there are no lumps in the batter.
- Strain the crepe batter using a fine strainer before transferring to another clean container. Cover with cling wrap and chill for at least an hour.
- Heat a lightly oiled 10” frying pan on medium-low heat, and pour a ¼ cup of crepe batter into it. Cook the crepes for two minutes on the first side, then 30 seconds on the other side.
- Transfer the cooked crepes to a wire rack and let them cool. The batter should give around 18 to 20 crepes. Once you’re done with cooking all of them, cover with cling wrap and chill in the fridge.
- To prepare the cream, whisk the whipping cream with a hand mixer until small bubbles form. Add the sugar and continue to beat until medium peaks form.
- Layer the cake by placing a piece of crepe at the bottom of a cake stand or large plate, layer on a scoop of whipped cream, and continue this process until there are no crepes remaining. There’s no need to apply whipped cream on the top of the final layer.
- Place a round plate on the top of the cake and run a knife around the plate to trim off the edges. Place the cake in the fridge to firm up for at least 30 minutes.
- Decorate the cake by sprinkling matcha powder through a fine sieve. You may choose to serve it immediately, but it’s best to chill for at least an hour before serving. Keep the cake covered and you’ll be able to store it in the fridge for at least two days.
Recipe adapted from Just One Cookbook‘s post.
No-bake Cheesecake recipes
9. Strawberry Cheesecake
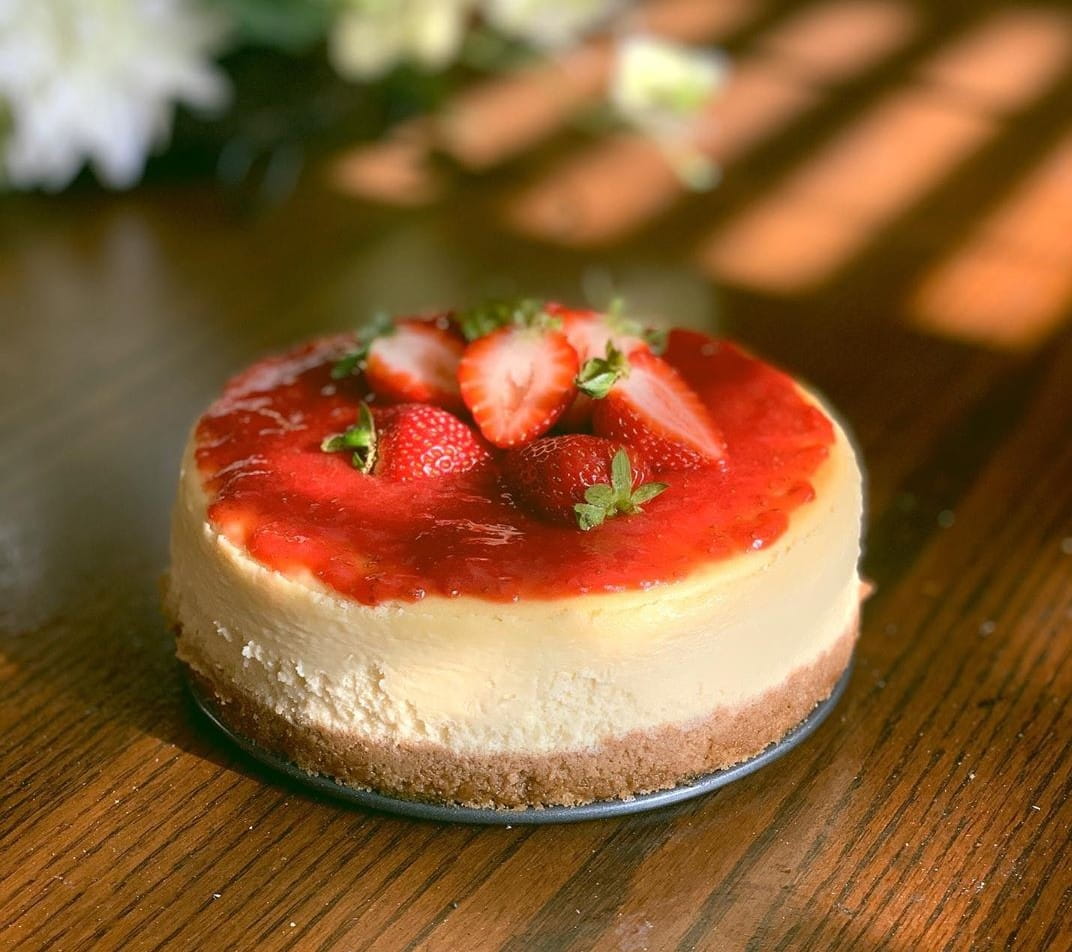
Image credit: @xtashii
This no-bake, gelatin-free Strawberry Cheesecake has the right balance of acidity and sweetness with its pastel pink cheesecake layer and buttery graham cracker base. To decorate, we recommend using fresh Korean strawberries as they are sweeter and tend to be more even in size.
If you don’t own a springform pan, you can also use a cake pan with a removable base. Just remember to line the sides of the pan with parchment paper so that the cake can be removed later.
Yield: Serves 12
Time needed: 30 minutes
Ingredients
Cheesecake base:
200g graham crackers
½ cup butter, melted
Filling:
450g cream cheese
¾ cup sugar
1¼ cup strawberries, hulled and thinly sliced
1 tsp vanilla extract
1 cup cold heavy whipping cream
Garnish:
Strawberries (optional)
Steps:
- In a ziplock bag, crush the graham crackers into fine crumbs.
- Combine graham cracker crumbs with melted butter and mix thoroughly.
- Pour mixture onto a 9-inch circular cake pan or 8-inch square pan and press it into the base evenly. Refrigerate for 30 minutes.
- In a large bowl, whisk heavy whipping cream until stiff peaks form. Separate the whipped cream into two bowls and place one bowl in the refrigerator.
- In a blender or food processor, blend cream cheese, sugar, sliced strawberries, and vanilla extract together until completely smooth.
- Fold in one bowl of the whipped cream to the strawberry-cheesecake mixture in batches.
- Pour cheesecake filling into the pan and smooth out the top with a spatula.
- Freeze the cheesecake for at least 4 hours, or refrigerate overnight.
- Decorate the top of the cake with the remaining bowl of whipped cream and strawberries.
Recipe adapted from Life, Love and Sugar and Bigger Bolder Baking‘s posts.
10. Coffee Chocolate Cheesecake
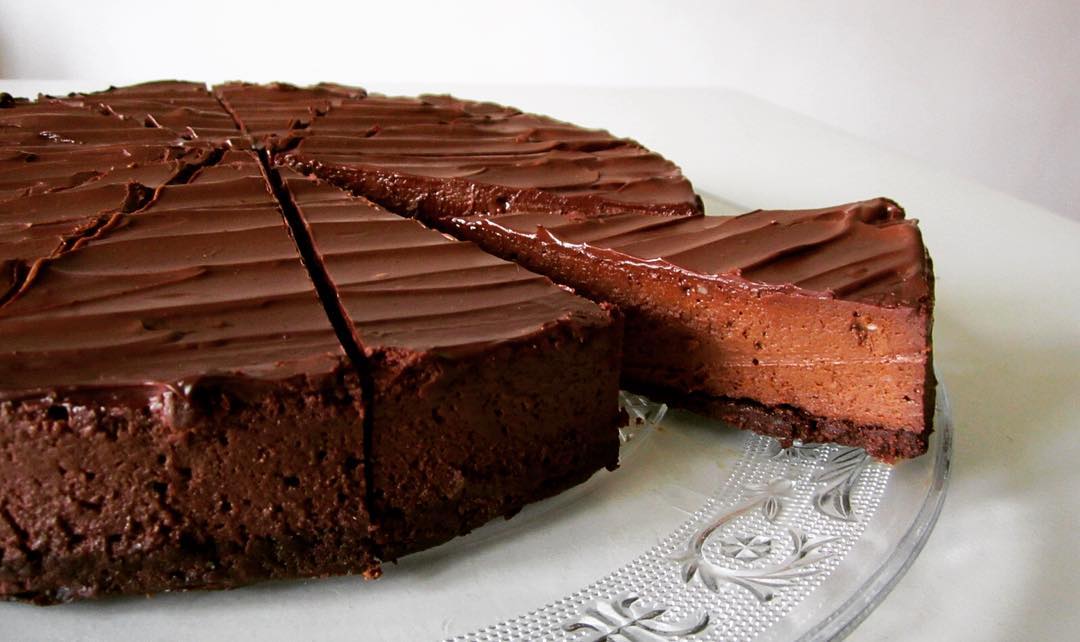
Image credit: @brittonsbakeryandcakery
This decadent Coffee Chocolate Cheesecake creation has a bittersweet Oreo-espresso crust, coffee cheesecake filling, and a rich dark chocolate ganache. For the best results, use high quality dark chocolate.
The dark chocolate ganache gives the top of the cheesecake a smooth, glossy finish, but if you want to zhng up its presentation further, sprinkle chocolate shavings over the top or reserve some ganache to pipe on later.
Yield: Serves 12
Time needed: 40 minutes
Ingredients
Crust:
36 Oreo cookies
½ cup unsalted butter, melted
1 tsp espresso powder or 1 tbsp instant coffee powder
Filling:
400g dark chocolate, roughly chopped
1½ tsp espresso powder or 2 tbsp instant coffee powder
675g cream cheese, at room temperature
1 cup white sugar
¼ cup light brown sugar, packed
1 tbsp cocoa powder
1½ tsp vanilla extract
1 cup heavy whipping cream
Ganache:
225g dark chocolate, finely chopped
1¼ cups heavy whipping cream
¼ cup unsalted butter, at room temperature and cubed
1 tsp espresso powder or 1 tbsp instant coffee powder
Steps:
- In a ziplock bag, crush 36 Oreo cookies, without removing their fillings, into fine crumbs.
- Combine crumbs with melted butter and coffee powder. Mix thoroughly.
- Pour mixture onto the pan and press it into the base evenly. Refrigerate for 30 minutes.
- In a double boiler over low heat, slowly melt the dark chocolate chunks, stirring occasionally. Remove the pot from the heat and stir in the coffee powder.
- Using a whisk or hand mixer, whisk the cream cheese until completely smooth.
- Add white and brown sugar, cocoa powder, heavy cream, and vanilla extract. Mix until everything is well-incorporated.
- Fold in the chocolate and coffee mixture.
- Pour cheesecake filling into the pan and smooth out the top with a spatula.
- Freeze the cheesecake for at least 4 hours, or refrigerate overnight.
- To prepare the ganache, heat a saucepan over medium heat. Add the heavy whipping cream and bring it to a simmer.
- Place finely-chopped dark chocolate in a bowl and whisk in the warm heavy cream in batches.
- Add in the cubes of butter as well as coffee powder. Stir until the ganache is smooth and glossy.
- Pour the ganache over the chilled cheesecake and refrigerate until the ganache is set.
Recipe adapted from Baker by Nature.
Easy no-bake cake recipes
Baking is one of the best ways to relieve the stress of working from home, and nothing feels more gratifying than sharing your home-made treats with family. This list of no-bake cakes is a good place to start for beginners who don’t want to worry about burning their sweet creations!
If you are looking for more easy cooking adventures while working from home, check out our list of zhnged-up instant noodle recipes. For more rice-cooker recipes, take a look at our Mentaiko Mac and Cheese recipe.
10 Zhng-ed Instant Noodle Recipes Including Cheesy Ramen, Indomie Pizza And More
Feature image is adapted from @xtashii, @_01.mmm, and @michaelliu1126‘s posts.
Drop us your email so you won't miss the latest news.
